- Day 23 – Completing the SeeYou Culture Map
- Day 10
- Day 2
- Day 3
- Day 4
- Day 5
- Day 6
- Day 7
- Day 8
- Day 9
- Day 11 – Green everywhere!
- Day 22 – Correcting map problems
- Day 13 – Eureka! A SeeYou map for Caesar Creek
- Day 14 – Getting trees in the right places
- Day 15 – Finishing up the Forest
- Day 16 – Two trees forward, one forest backward :-(
- Day 17 – Regula Rides to the Rescue!
- Day 18 – I’ll take 110 servings of 2 pixels to the left, please
- Day 19 – Roadblocks, Triumphs and Disasters, oh my!
- Day 20 – More Airports
- Day 21 – Adding Rivers, Roads, and Towns
- Day 1
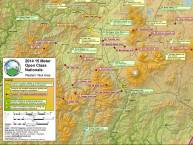
After getting some airports added to my Caesar Creek scenery (see Day 20), I decided to tackle my long-held dream of adding rivers, roads, and towns to my scenery. After all, what’s the use of having a local scenery if there isn’t anything ‘local’ about it – like the huge Caesar Creek reservoir just east of the field, or the Dayton, Columbus, and Cincinnati metro areas, not to mention all the small towns and villages. I’ve been flying out of CCSC for at least 15 years, and I still don’t know the names of the small towns on the way to Madison County airport (about 40 miles northeast, along rt 42), so maybe having a map in my CCSC scenery will improve my RL geolocation skills!
Way back when all this started in July of 2012, I remembered seeing a video tutorial where the author used a Photoshop script called ‘Condor-Cut’ to slice and dice a BMP image containing culture (rivers, roads, lakes, towns) information into Terragen tile-sized pieces so they could be laid over top of Terragen tiles, and I thought I might be able to do the same thing with a SeeYou bitmap image of the right size (which I just happened to have). My scenery consists of 110 tiles, where each tile is a 512 x 512 pixel bitmap image. So, the overlay image has to be exactly 5632 x 5120. In a previous operation I had set up SeeYou to show the same (as closely as possible) are as my scenery, and then captured it to a bitmap, then resized the captured image to exactly 5632 x 5120.
First, I had to find the Condor-cut script, and that turned out to be a bit of a job all by itself. However, thanks to the magic of Google (does anyone remember when we actually had to search for things in magazines and paper catalogs?) I was able to quickly hone in on and download condor-cutjoin.rar (see the Condor forum topic http://forum.condorsoaring.com/viewtopic.php?t=5136&highlight=cut+join) containing condor-cut.jsx and condor-join.jsx scripts for Photoshop.
Next, because I’m a paranoid and *never* launch scripts without first examining them, I opened condor-cut in a text editor (I use TextPad). Turns out there is a nice description of the purpose and intent of both scripts, along with the scripts themselves, so that was pretty straightforward. However, the procedure described in the text didn’t quite match the script body, so I had to do a bit of editing to add some missing parameters. In the image shown below, the contents of ‘condor-cut.jsx’ is shown, along with the SeeYou map I want to use for my ‘culture’ overlay. The ‘ReadMe’ file shown in the right-hand TextPad window describes the steps needed to prepare the cut script (designating the target folder, the prefix to be used for each slice file, and the image extension), only the target folder parameter ‘var pathoutput = c:/temp” was specified, but both the ‘prefix’ and ‘extension’ variables were missing from the text and the script body. So, I added two lines to the ‘variables’ section so the final version was:
var tilewidth = 512;
var pathoutput=”c:/temp/”;
var fileprefix = “t”
var fileext = “bmp”
Then I edited the line “saveFile = new File(pathoutput + tx + ty + “.bmp”); ” to read instead “saveFile = new File(pathoutput + fileprefix + tx + ty + “.” + fileext);” to use the new ‘fileprefix’ and ‘fileext’ variables. After doing this, I took a deep breath and launched the script using the SeeYou capture image as the source for the dicing operation. Photoshop flailed around for what seemed like forever, but was in reality less than a minute, and then quit – what the heck?. But, then I looked into my C:\temp folder and found exactly 110 BMP images, labelled ‘t0000.bmp’ through ‘t1009.bmp’ – cool!
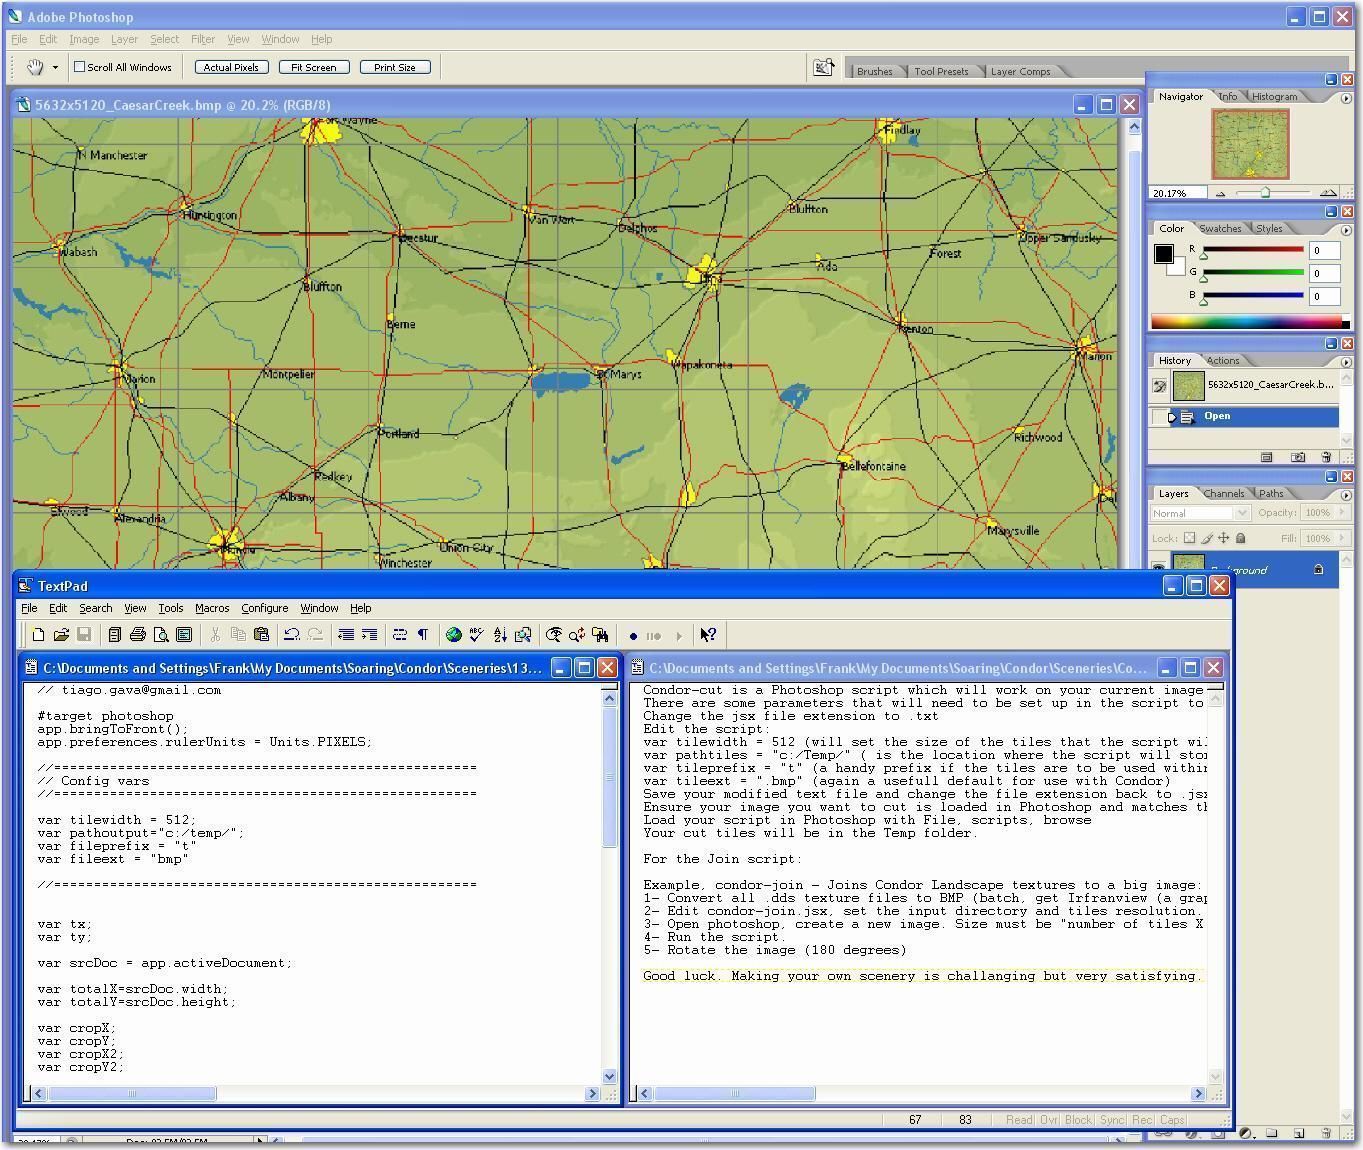
Preparing for the ‘dicing’ operation
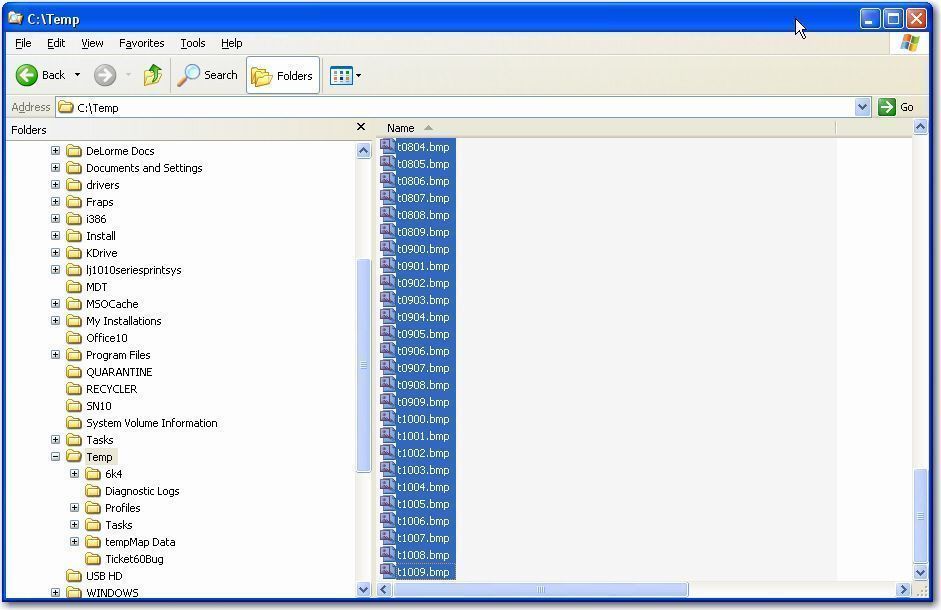
Result of dicing operation
Next, I opened Terragen tile 0302.bmp, as I know that is the tile that contains my CCSC airport, and the corresponding ‘t0302.bmp’ slice from the SeeYou map image, as shown below. Then, I copied everything in the Terragen image (using Ctrl-A & Ctrl-C) and pasted it into the SeeYou slice (Ctrl_V in the layer area). This resulted in two layers – the original SeeYou slice, and the image information from the corresponding Terragen tile file. Note that I had previously changed the SeeYou ‘background’ layer to a real layer by double-clicking on it and OK’ing the default ‘Layer 0’ label. Then I selected (highlighted) the Terragen layer (layer 1) and set it’s opacity to 15% (mostly transparent) to get the flavor of the Terragen coloring scheme, without detracting significantly from the SeeYou coloring scheme. This is strictly a subjective judgement call, and I played around with opacity settings from 10% to 50% before settling on the 15% number. Once this was done, I merged the two layers together with the ‘Layer -> Flatten Image’ menu option, and saved the result to C:\Program Files\Condor\Landscapes\CaesarCreek\Working\Terragen’ folder as ‘0302.bmp’ (after saving the original 0302.bmp to a safe place).
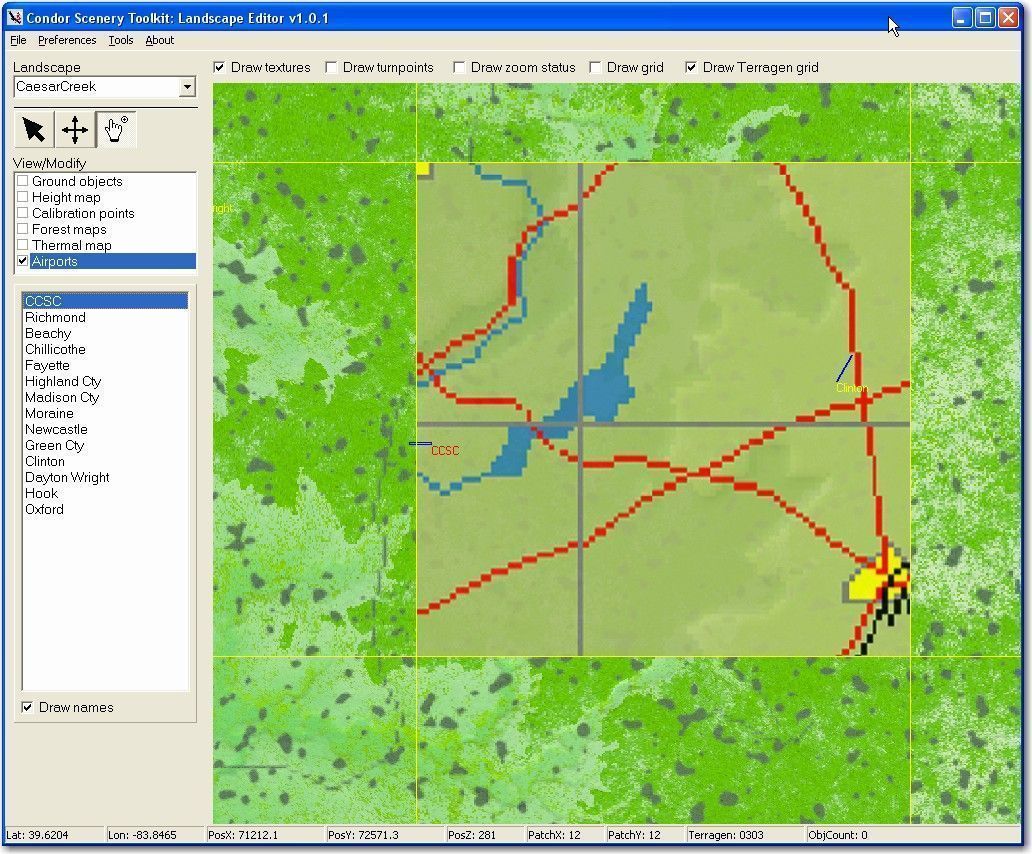
Next, I launched Landscape Editor and told it to import Terragen textures, which confirmed that the SeeYou/Terragen tile merge image did indeed show up properly, and then I exported the information to Condor with ‘File -> Export Textures to DDS’.
Lastly, I opened Condor and tested the result. As shown below, the operation worked, and I now have one tile (out of 110) showing roads, rivers, lakes and towns from the SeeYou map. Of course, it doesn’t look all that great due to the extremely low 512 x 512 pixel resolution, and it has huge gray latitude/longitude lines painted on the surface (oops), but the lakes and rivers are generally in the right places, and a small town (yellow spot in the background) is visible in the distance, so I’m happy (by this time, I’m pretty easy to please when it comes to my Caesar Creek scenery!).
At this point ‘all’ I have left to do is to repeat the above procedure another 109 times to merge all the SeeYou tiles with the corresponding Terragen tiles, and add a bunch more airports, to finally have a scenery that I can ‘publish’. Of course, as noted above, at 512 x 512 the CaesarCreek scenery isn’t going to win any awards for realism and fidelity, but what do you want from a first-time scenery developer with no brains and less talent! ;-).
Now that I have access to the ‘Condor-cut’ and ‘Condor-join’ Photoshop scripts, I think I’ll try to generate a Photoshop script to do the remaining 109 tile merges, so that later on when I attempt to upgrade my scenery from 512 x 512 to 2048 x 2048 (David Regula assures me this is ‘a piece of cake’ to do – right!) I will have the script tools to make it easier. And, I’m thinking it wouldn’t be too difficult to generate another SeeYou capture without the ugly gray lat/lon lines, so I might try that too. Stay tuned!
Frank (TA)
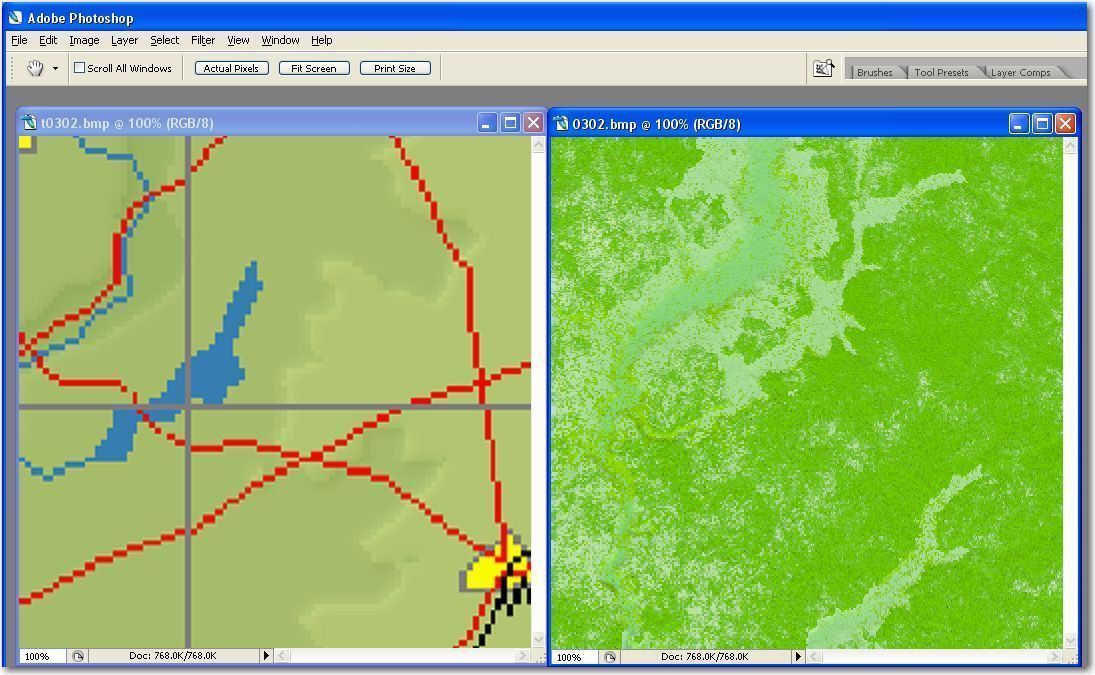
Diced file (t0302.bmp) on the left, original Terragen texture tile (0302.bmp) on the right
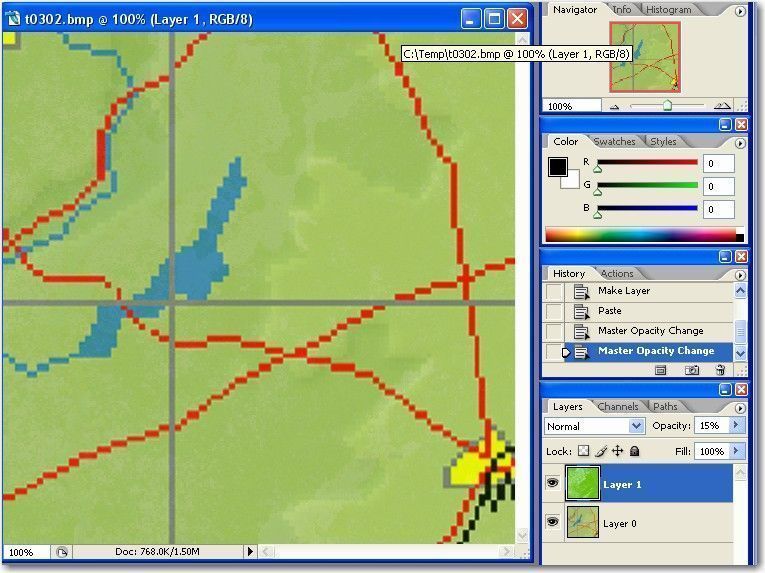
Copied Terragen tile to SeeYou BMP file as a new layer, then set Terragen layer to 15% opacity (mostly transparent)
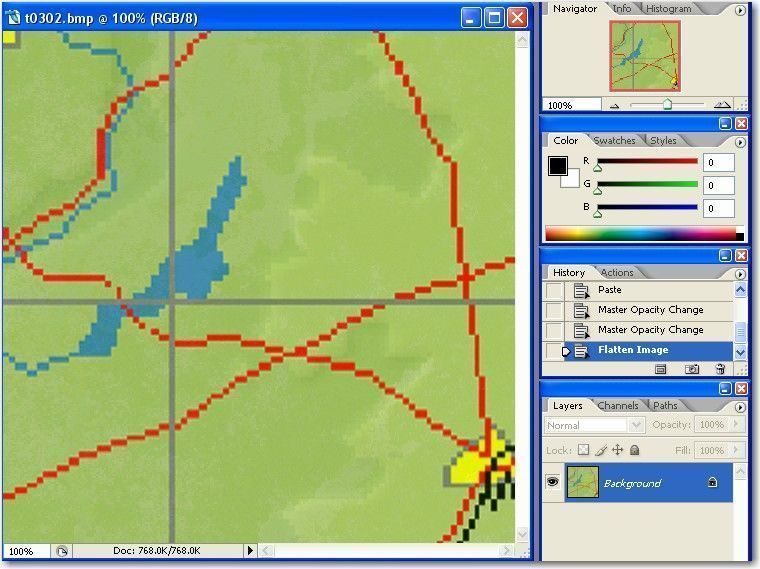
In Photoshop, after merging (‘Flattening’) SeeYou and Terragen tiles into one BMP image
Landscape Editor showing SeeYou culture information merged onto Terragen tile
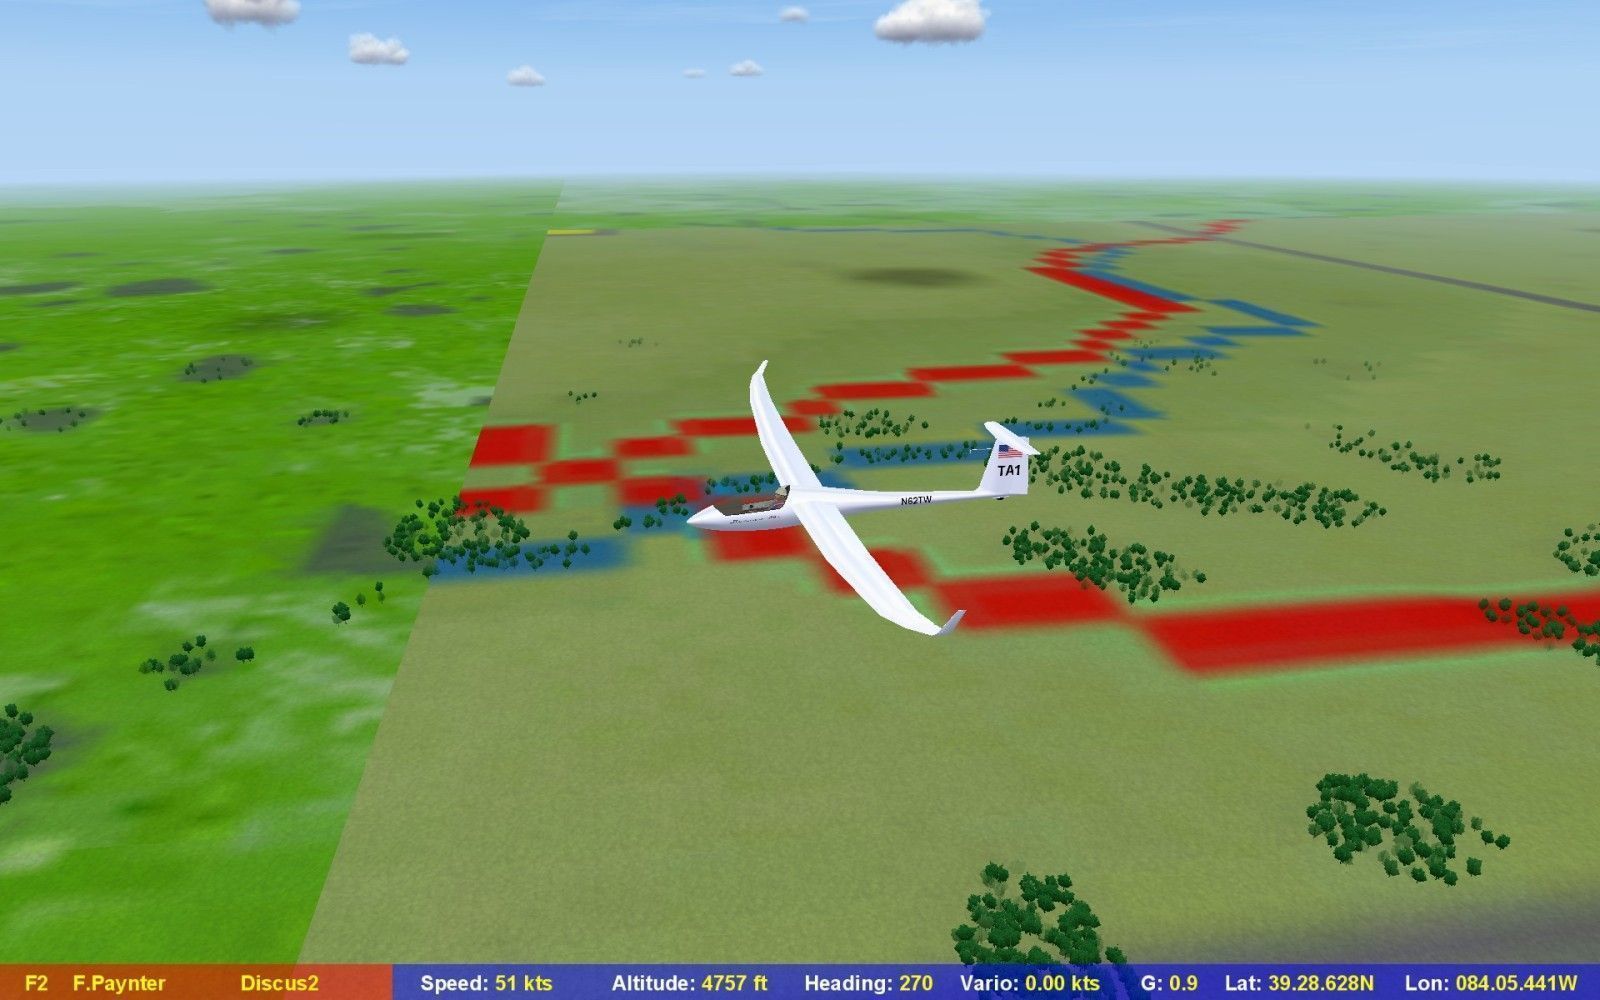
In Condor, showing the SeeYou culture information in flight