- Day 23 – Completing the SeeYou Culture Map
- Day 10
- Day 2
- Day 3
- Day 4
- Day 5
- Day 6
- Day 7
- Day 8
- Day 9
- Day 11 – Green everywhere!
- Day 22 – Correcting map problems
- Day 13 – Eureka! A SeeYou map for Caesar Creek
- Day 14 – Getting trees in the right places
- Day 15 – Finishing up the Forest
- Day 16 – Two trees forward, one forest backward :-(
- Day 17 – Regula Rides to the Rescue!
- Day 18 – I’ll take 110 servings of 2 pixels to the left, please
- Day 19 – Roadblocks, Triumphs and Disasters, oh my!
- Day 20 – More Airports
- Day 21 – Adding Rivers, Roads, and Towns
- Day 1
Near the end of Day 15 – Finishing up the Forest, I ran into yet another roadblock when trying to implement the following steps from the Condor Scenery Toolkit (CST) manual:
Step 2:
Open Terragen and open TerragenCondor.tgw world file.
Terragen should now ask you to open a bitmap, choose Total overlay, and leave the rest the same and then click OK.
Hmm, I don’t remember seeing this file, so I did a search of my C:\ drive for ‘TerragenCondor.tgw’, and found it in the ‘C:\Program Files\Condor\CondorSceneryToolkit\GenericFiles\Terragen’ folder. Opened it in LE as directed, only to see that we’re back to that generic world file with all the layer names in the original Slovenian. Oh well, I’ve already been incorporated into the PhotoShop borg, so what’s one more indignity? Hmm, I didn’t get a message asking about opening a bitmap, either….
Step 3:
Choose the desired coniferous tile example :
\Landscapes\yourLandscape\Working\Terragen\ConiferousTile_XXYY and then click OK.
I was able to generate the Coniferous/Deciduous_XXYY.bmp files based on a tip from Arneh from the Condor forums, but I never saw the ‘Total Overlay’ dialog referred to in Step 2 above. I posted about the difficulty to the Condor Forum, but after several days, I still hadn’t gotten anything useful back from the Condor forums – very unusual! So, I emailed David Regula, my scenery go-to guy. I hate bothering David with stuff that he has probably forgotten about, but I was badly stuck. As it turned out, even David didn’t have a good idea what my problem was, so I was well and truly screwed!
Searching through the forums, and thinking about the CST procedures, I came to the conclusion there was something special about ‘TerragenCondor.tgw’ – something that triggered the ‘Total Overlay’ dialog when it was opened. Nothing happened for me when I opened this ‘World’ file, so I started a fairly detailed search of every option and parameter of every surface definition (not helped at all by the fact that the TerragenCondor.tgw surface descriptions are all in Slovenian!). The only thing I found that might have any relevance at all was when I randomly clicked on the ‘Tex’ button in the ‘Advanced Distribution’ section of a surface. This brought up a ‘Distrubution Textures’ dialog with a ‘SO Image Overlay’ line shown. When I clicked on the on the ‘Edit’ button. This brought up another dialog box, labelled ‘Set Image Overlay Options’ , and on this was a ‘Total Overlay’ radiobutton – AHA!! Looking around on this dialog, I also found a ‘Image File (BMP)’ selection field, which I thought might be the one referred to by the ‘Step 3: Choose the desired coniferous tile example’ instruction above.
So, what I wound up doing was to create a new surface layer for my Caesar Creek ‘World’ (TGW) file called ‘Deciduous Forest’, and adding ‘SO Image Overlay’ as a distribution texture in the ‘Advanced Distribution’ section. Then I edited this layer to bring up the ‘Set Image Overlay Options’ dialog, and selected the ‘DeciduousTile_0302.bmp’ as my overlay image. I also selected the ‘t0302.ter’ file for the Terragen tile to be rendered, and rendered the tile, as shown in the following image (I used red coloring for the surface to make sure I could distinguish forest areas from everything else).
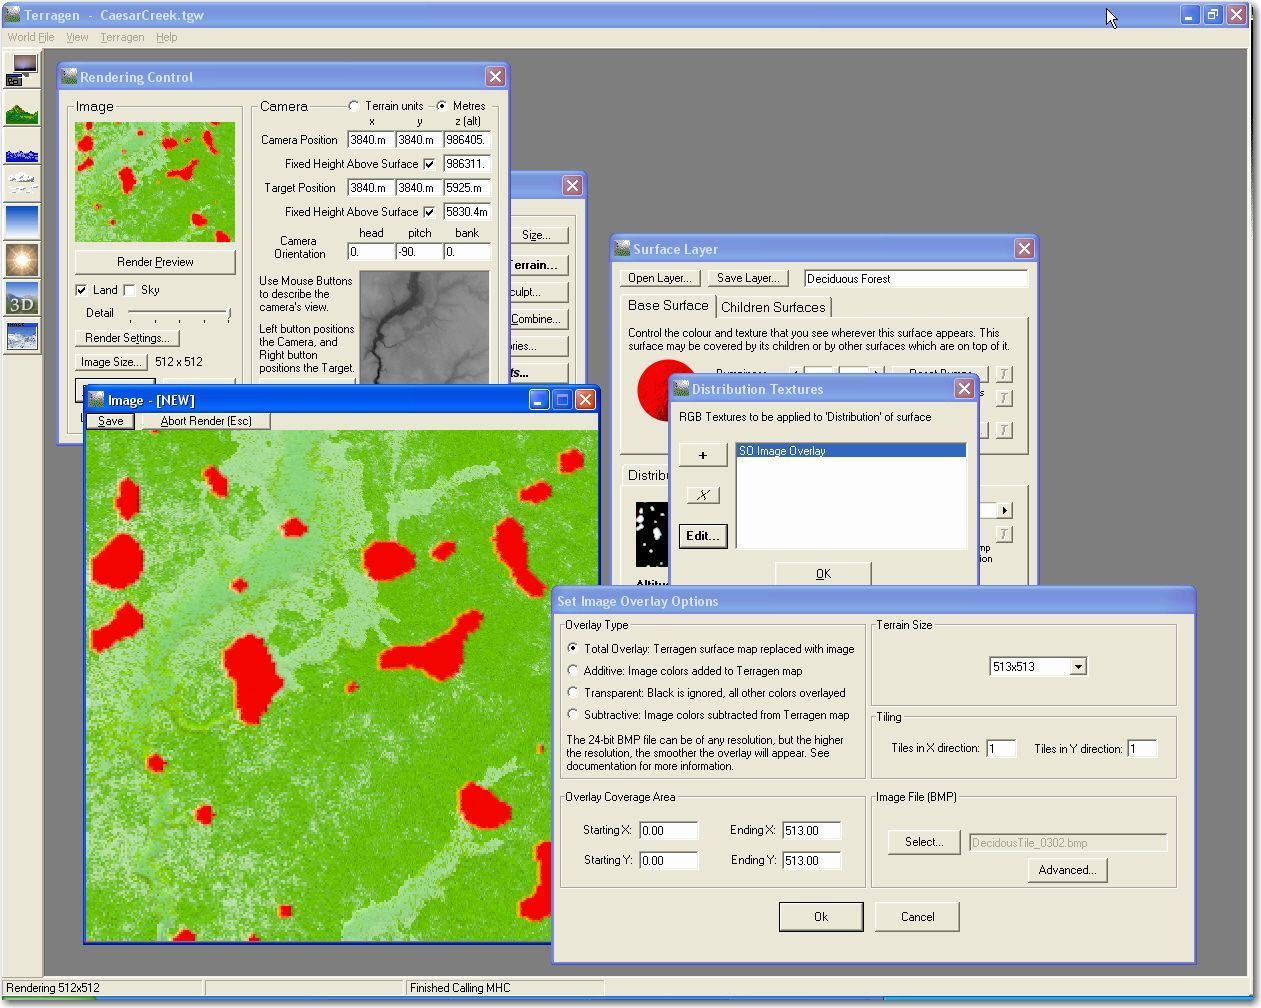
Result of rendering Terragen tile 0302.ter using SO Image Overlay and DeciduousTile_0302.bmp
Step 5:
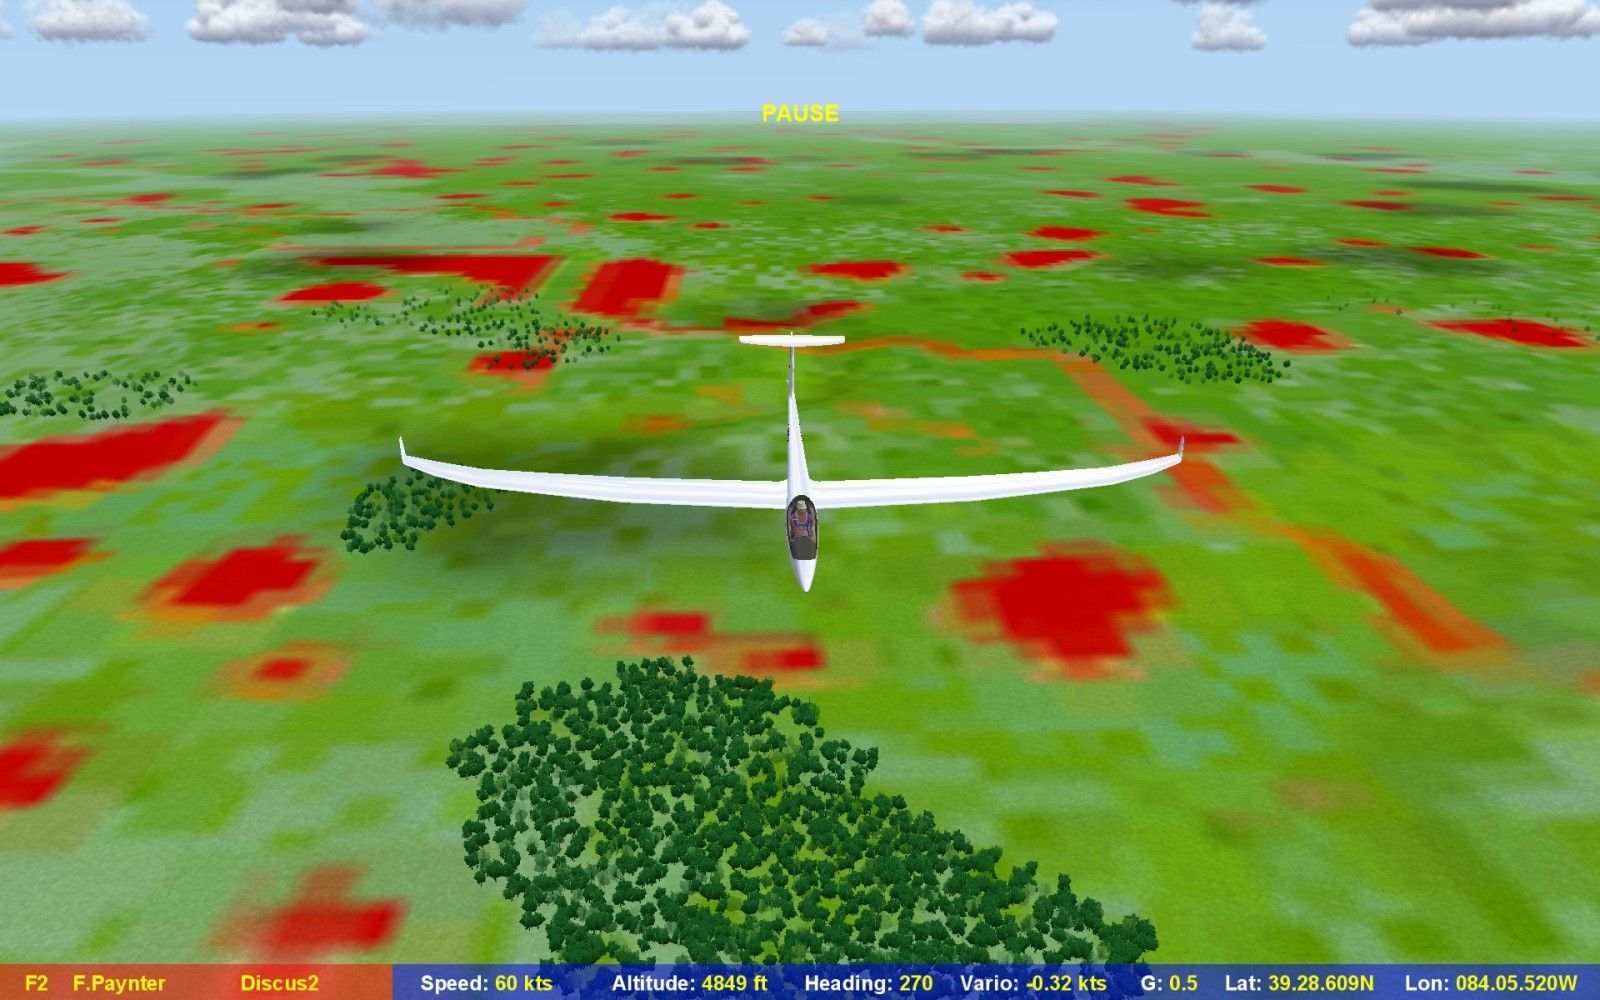
I saved the above render result back to 0302.bmp, and then launched Landscape Editor (LE) to view the tile in the total landscape, and also to convert the rendered tile to DDS format so I could test it in Condor. When I opened it in LE, I was surprised to see that the red blotches I had just created did not match the forest map created in an earlier step. This was quite puzzling, as I was pretty sure that the DeciduousTile_0302.bmp was generated by simply slicing up the total forest map image DeciduousMap.bmp. Moreover, when I used LE to export the forest map to DDS tiles and actually tested it in Condor, not only did the red splotches not line up with the forest areas in tile 0302 (the area directly east of the CCSC airport), but I now had forests in all tiles – how did that happen? I would have sworn from the CST description that I was going to have to render each of my 110 tiles with the corresponding DeciduousTile_XXYY.bmp selected for texture distribution in Terragen, and then use LE again to convert the rendered tiles to DDS format. Instead, I appear to have generated the forests without using Terragen at all!
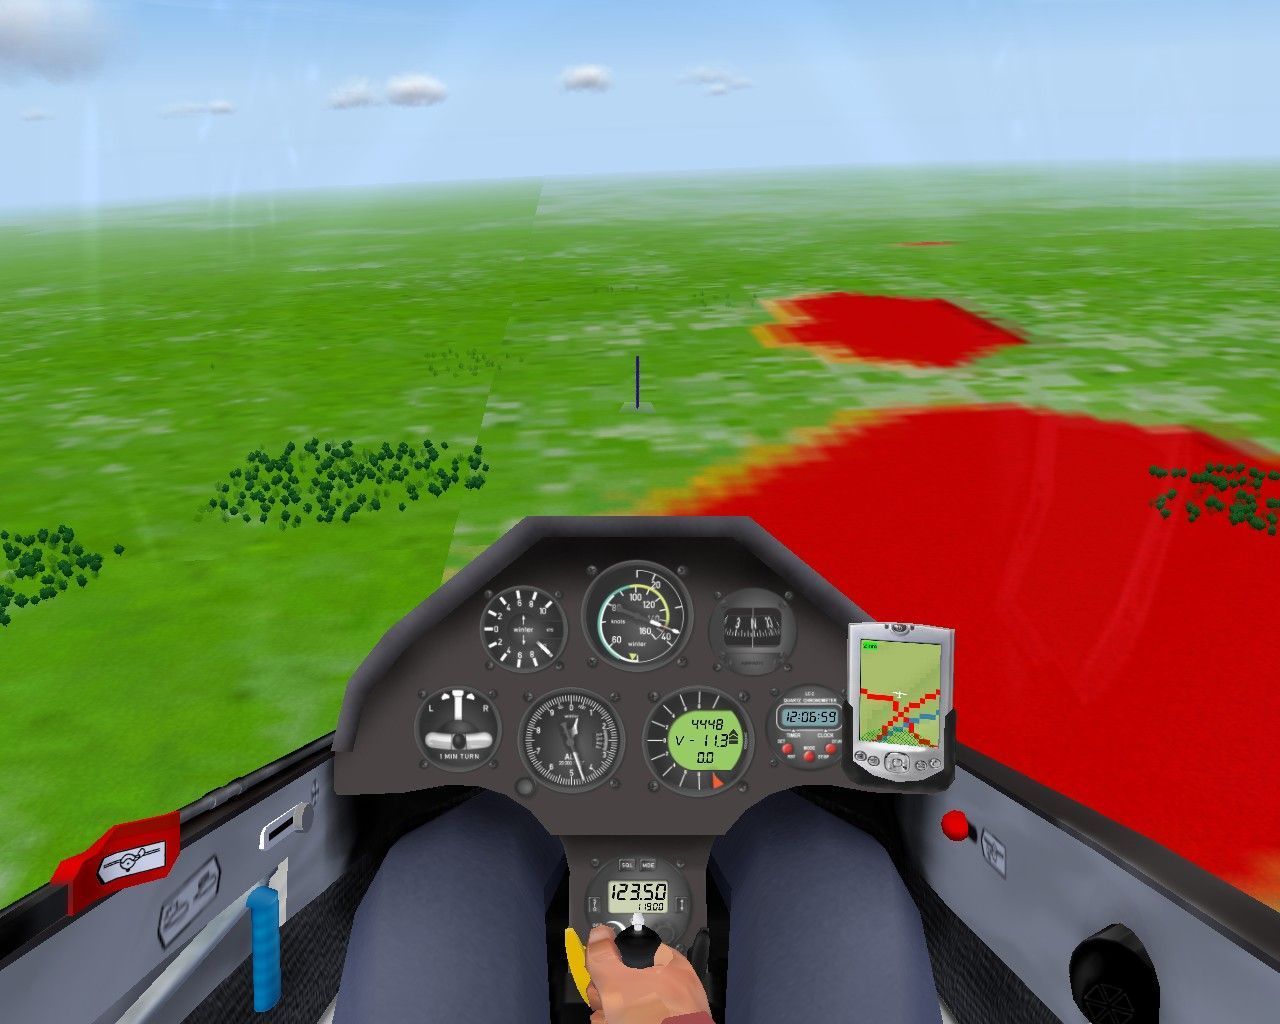
Flying north from CCSC along the border between tile 0402 (left) and 0302 (right). Note that forest areas in 0302 do not match up with red splotches, and there are forests in 0402 even though I only applied the texture distribution to tile 0302
Dave Regula, scenery guru extraordinaire, had some ideas but no real show-stopper explanations for why this should be. And, in his defense, he has long since stopped making sceneries with Terragen, having moved on to absolutely stunning photorealistic treatments years ago. He did have a thought that maybe I had screwed up the scaling on the texture distribution rendering, and indeed I had. When I first figured out how to use a texture for advanced distribution, I used 513×513 for the terrain size, when I should have (I think) used 257×257. However, even that correction didn’t make the red splotches from the texture render operation line up with the forest map in LE.
After obsessing about this for a few days, I decided that I should go back to basics and thoroughly understand the process of generating forests in Condor using the ‘Terragen Method’, which I now believe goes something like this:
- In Photoshop, use the ‘2DHyperCloud’ utility to generate a b/w bitmap the same size in pixels as the entire scenery, containing a random distribution of white splotches on a black background. Modify this pattern by overlaying any water and city areas and turning those areas black so no forests can grow (white = forest, black = no forest).
- Save this bitmap as DeciduousMap.bmp or ConiferousMap.bmp
- In Landscape Editor, view the forest areas (Deciduous in light green, Coniferous in darker green). Forest areas can be touched up using the appropriate forest edit tool.
- In Landscape Editor, select ‘Files->Export Forest Map’ to generate the CaesarCreek.for file.
- In Landscape Editor, select ‘Tools->Export Forest Maps to Terragen Tiles’ to generate the Deciduous/Coniferous_XXYY.bmp files
- In Landscape Editor, select ‘Files->Export Textures to DDS’ to generate the DDS files actually used by Condor.
The above 6 steps appear to be sufficient to cause trees to show up in the forest areas all over the scenery. However, as shown in the above screenshot from Condor, distant forest areas aren’t visible because distant trees aren’t rendered by the Condor graphics engine, and without a distinct ‘forest’ color background under the trees, distant forest areas look just like all the other areas. So, adding an appropriate forest color in areas that would have trees if they were close enough to be rendered, is what Task 6 Part D is all about. What should have happened is that when I applied DeciduousTile_0302.bmp as a texture distribution mask to my new ‘Deciduous Forest’ layer in CaesarCreek.tgw along with t0302.ter, an appropriate background color (in my case RED) would have been applied to all the areas in that particular tile that would have trees assuming the pilot was close enough to see them. What actually happened is the background color got applied to some other random pattern that didn’t match the original forest map at all! I somehow screwed something up in the above procedure, and got a completely different pattern than the one I was expecting.
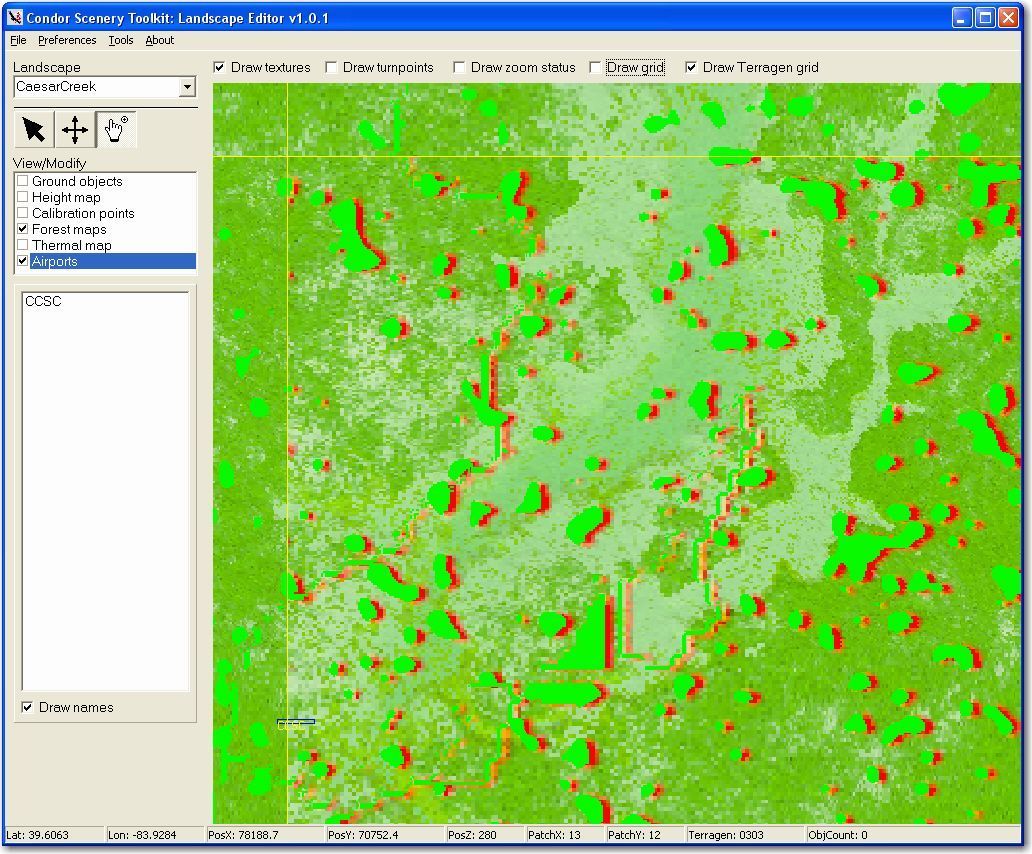
As a first step in troubleshooting the problem, I decided to determine which of the two forest distributions for tile 0302 was correct – i.e. which distribution matched the original distribution map produced in Photoshop. This was a bit of a job, as it meant I had to find the tiny little section of the huge Photoshop b/w bitmap that corresponded to tile 0302, and then compare the white splotches in that section with the light green and/or red splotches in the Landscape Editor view of tile 0302. As the following screenshot shows, I did manage to do this, and once I got everything lined up it was obvious that the light green splotches matched, and the red ones did not.
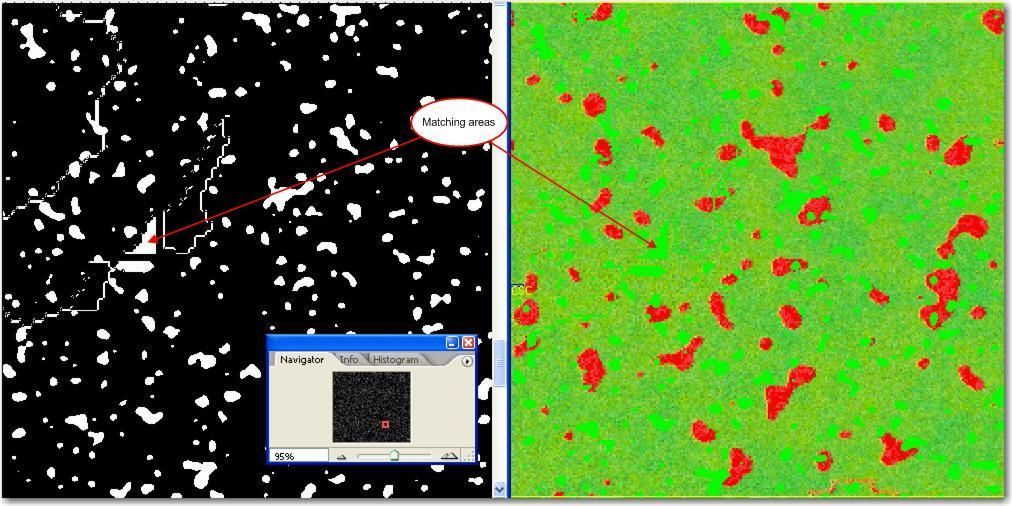
Comparison of Photoshop and Landscape Editor forest maps. Note the distinctive triangular shaped area about halfway up the left-hand side of both images. The navigator view of the Photoshop image is included for orientation
The next step is to determine if any of the DeciduousTile_XXYY.bmp images contain the correct forest pattern for tile 0302 – maybe there was an ‘off-by-one’ error in generating the individual tile slices of the overall forest map? So, I did a manual scan of all the DeciduousTile_XXYY.bmp files, looking for that distinctive triangular forest area noted above – no joy. However, I did notice something strange – there are too many DeciduousTile_XXYY.bmp files! My landscape has 110 tiles numbered from 0000 at the lower right-hand corner to 1009 at the upper left-hand corner, arranged in 11 columns of 10 tiles each. But there are 440 DeciduousTile_XXYY.bmp files, numbered 0000 through 2119 – what gives!? Each DeciduousTile_XXYY.bmp file is 512×512 pixels, so a 22 column by 20 row arrangement would be exactly twice the size of my original scenery – hmm….
I made a copy of my Working/Terragen folder to avoid losing previous work (don’t really know why, as my previous work is clearly worthless, but…) and then deleted all the Coniferous/DeciduousTile_XXYY.bmp files, all 880 of them. I carefully copied my saved copy of DeciduousMapNoWaterNoCities5632x5120.bmp to DeciduousMap.bmp to make sure I was dealing with the correct size image, and then launched LE to verify that the overall forest map was what I expected. Next, I selected ‘Tools->Export Forest Map to Terragen’ to regenerate the terragen tile-sized textures, and Lo and Behold, this time I only got 110 DeciduousTile_XXYY.bmp files – Yay! Even more miraculously, DeciduousTile_0302.bmp now looks like it should, as shown in the following figure!
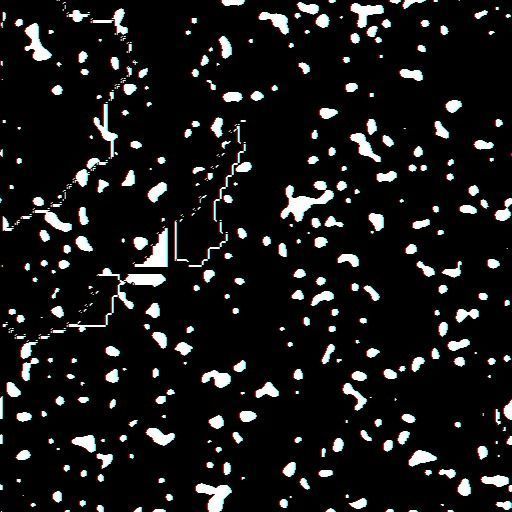
DeciduousTile_0302.bmp after re-exporting forest map to Terragen tiles
Capitalizing on my new-found good fortune, I quickly brought up Terragen, loaded my CaesarCreek.tgw ‘World’ file, and re-rendered tile 0302 using the above image as the distribution texture for my ‘Deciduous Forest’ surface. Then back to LE to re-import textures and re-export to DDS, then over to Condor to test. As shown in the following images, now the red splotches match up with the forest areas exactly (well, almost exactly)!
In Landscape Editor after regenerating the forest map Terragen tiles and re-rendering tile 0302
To correct the offset, I tried diddling with the offset values in the ‘Set Texture Distribution Options’ dialog. The good news is that offsetting the rendered image works, but the bad news is I needed to offset the render 1 pixel to the left, and this feature only allows offsets to the right :-(. Oh well, the very slight offset between the LE notion of the forest map and the Terragen notion of the tile 0302 forest map shouldn’t be that big of a deal. Moving on, I exported the textures to DDS and tested in Condor, with the following results. As the screenshot shows, there is still a significant discrepancy between the red splotches and the actual forest areas, even though the red areas now (mostly) match the LE forest map (the triangular forest map area can now be clearly seen in the background).
Screenshot in Condor showing red triangular forest area in background. Note that actual treed areas still don’t match up with red splotches.
So, what’s the deal here? I thought I had done everything correctly at this point, with the red splotches matching (mostly) the light green forest areas in LE, but now I find that even that doesn’t result in the trees matching up properly – what more am I missing? Stay tuned as the mystery unfolds (if it ever does)!


3 comments for “Day 16 – Two trees forward, one forest backward :-(”