- Day 23 – Completing the SeeYou Culture Map
- Day 10
- Day 2
- Day 3
- Day 4
- Day 5
- Day 6
- Day 7
- Day 8
- Day 9
- Day 11 – Green everywhere!
- Day 22 – Correcting map problems
- Day 13 – Eureka! A SeeYou map for Caesar Creek
- Day 14 – Getting trees in the right places
- Day 15 – Finishing up the Forest
- Day 16 – Two trees forward, one forest backward :-(
- Day 17 – Regula Rides to the Rescue!
- Day 18 – I’ll take 110 servings of 2 pixels to the left, please
- Day 19 – Roadblocks, Triumphs and Disasters, oh my!
- Day 20 – More Airports
- Day 21 – Adding Rivers, Roads, and Towns
- Day 1
It’s been a while since I have added to this series. A number of things have intruded on my life, including some elective foot surgery (Morton’s Neuroma for the medically inclined). However, most of the delay has been self-induced, as I was completely stymied when I stopped before, and haven’t had the courage to tackle it again until just recently.
Yesterday I started by reviewing all my notes (Day 1 through Day 8) and reviewing several of ASH33M’s video tutorials. This really didn’t help me very much, but at least it convinced me that I wasn’t going to find the answers there. Then I swallowed my pride and yelled for help – I sent an email to David Regula (Condor scenery guru extraordinaire) asking if I could buy a clue or two from him, and he graciously called me back and spent some time educating a rank newbie like me.
According to David, the end product of all scenery design is the set of DDS files used by Condor to actually display the scenery as you fly. There are 16 DDS files for each tile in the scenery. The Condor Scenery Toolkit Landscape Editor (LE) utility converts a single image file (BMP, JPEG, etc) into multiple images (1×1, 2×2, 4×4, ….) and places them into the corresponding DDS file. Condor displays the appropriate sized image to the user, depending on how close they are (or how much zoom is being used) to that particular physical location. The input to LE is provided (at least initially) by TerraGen (TG), which produces bitmap images from terrain elevation information, combined the elevation-based rules noted above. Actually, LE doesn’t know or care where the input images come from as long as they are the right size and format – it just runs them through the machinery to produce the DDS files.
In addition to getting some clues that might get me past the latest obstacle, David gave me some fascinating background on the history of scenery design as it relates to Condor; apparently there have been two or three significant breakthroughs that have made scenery design and production much easier and of significantly higher quality. Originally, TG was used to read terrain data and color tiles using some common-sense rules, like everything above 3000 m was white for snow, everything between 1000 and 3000 m was green and covered in trees, and everything below 1000m was farmland. The output from TG was then fed to LE to produce the actual DDS files used by Condor. Then designers realized that the input to LE was just image files, which could be manipulated/edited by any number of image processing packages, so designers stated using PhotoShop (PS) to add map overlays and other details to their creations. The latest development is the ability to create photo-realistic sceneries by capturing image data from various sources and automatically creating the sliced-and-diced bitmap images for LE to convert to the required DDS files. A measure of how far scenery development has come can be obtained by comparing the original Slovenia scenery that comes with Condor by default, and the recently released Slovenia HD scenery. These two sceneries cover the same exact area, but the HD version is far more detailed and breathtakingly beautiful.
Anyway, back to the subject; David suggested that I run some experiments to gain some understanding of the machinery, starting with a small subset near my one and only airport at CCSC. He suggested that I use PS to modify these nearby BMP images in some obvious way, like overlaying a picture of my pet cats, or a solid color, or text. Then use LE to update the DDS files, and then fly in the scenery to see the effect. This would give me a handle on how the machinery works, and would, in theory, allow me to understand what I needed to do to enhance my scenery to a usable level.
In order to do this, I needed to know which tile(s) contained my airport. I knew from previous work that my airport was actually on the boundary between tiles 0302 and 0402 (tiles are numbered starting with 0000 at the lower right-hand corner, and proceeding up a column with 0001, 0002, to the top, then skipping to 0100 at the start of the next column, etc. Tile 0302 is the 3rd tile up from the bottom in the 4th column). Actually, it was even easier than that – all I had to do was open the landscape in LE and check the ‘Airports’ option in the View/Modify section, and the CCSC airport was shown on the landscape, so the appropriate tile numbers could be read off directly. Anyway, I sucked 0402.BMP and 0302.BMP into PS from C:\Program Files\Condor\Landscapes\Caesar Creek\Working\Terragen for modification. Instead of anything fancy, I just used PS to overlay “0402.BMP” and “0302.BMP” onto the respective tiles, figuring that should be easy enough to see. Then I saved them back to my ‘Working’ folder (after saving the originals to a safe place) and ran them through LE to produce a set of DDS files. Actually, I *tried* to run them through LE, but got a message that said ‘Nvidia texture conversion utility NVDXT.EXE not installed. Please read CST documentation for more information” – oops! OK, back to the CST documentation, where I did indeed find a reference to NVDXT.EXE as part of the Nvidia ‘Legacy Texture Tools’ utility package, but it is noted as ‘Recommended’, not required – hmm. Anyway, I found and installed the utility, and copied NVDXT.EXE to the CST install folder as directed, and tried the conversion trick again – and this time it worked! Moreover, now, for the first time, I had actual DDS files in my Caesar Creek\Textures folder (it was empty before – so Condor was just using some default textures based on the terrain files, I think). In addition, when I launched Condor in FreeFlight mode with my scenery loaded, I could actually see the labelled tiles to the east and west – woo hoo!!.
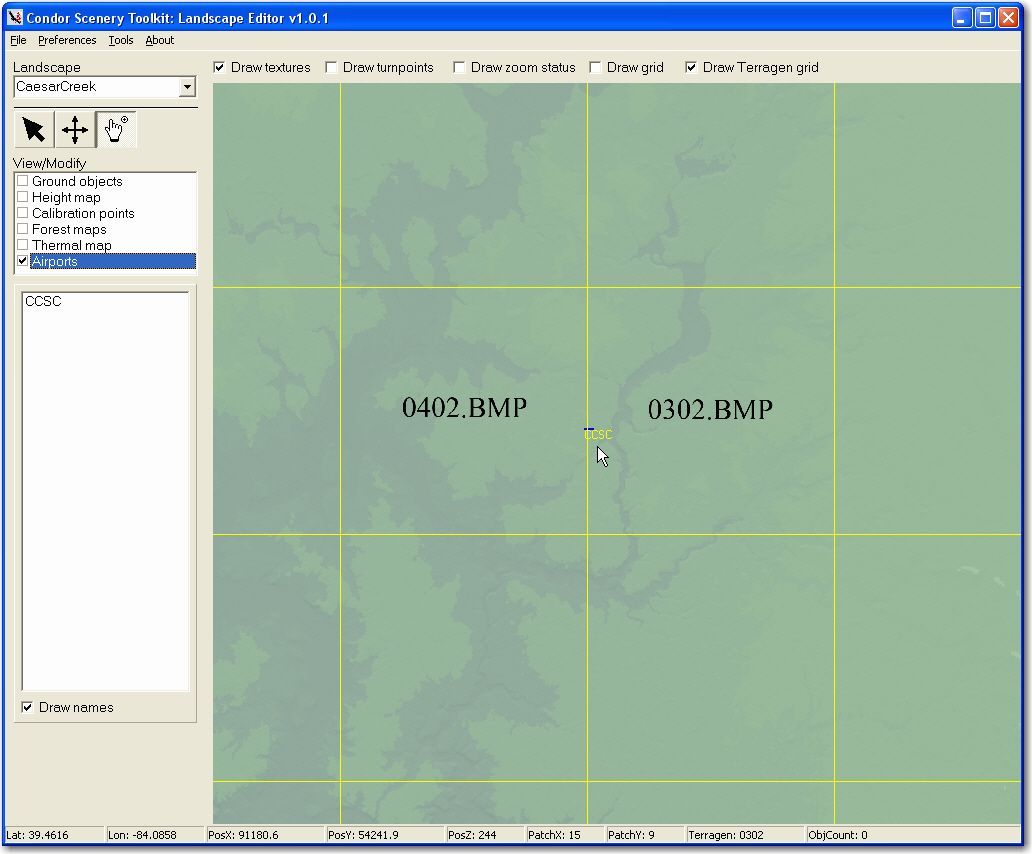
Landscape Editor showing modified tile images
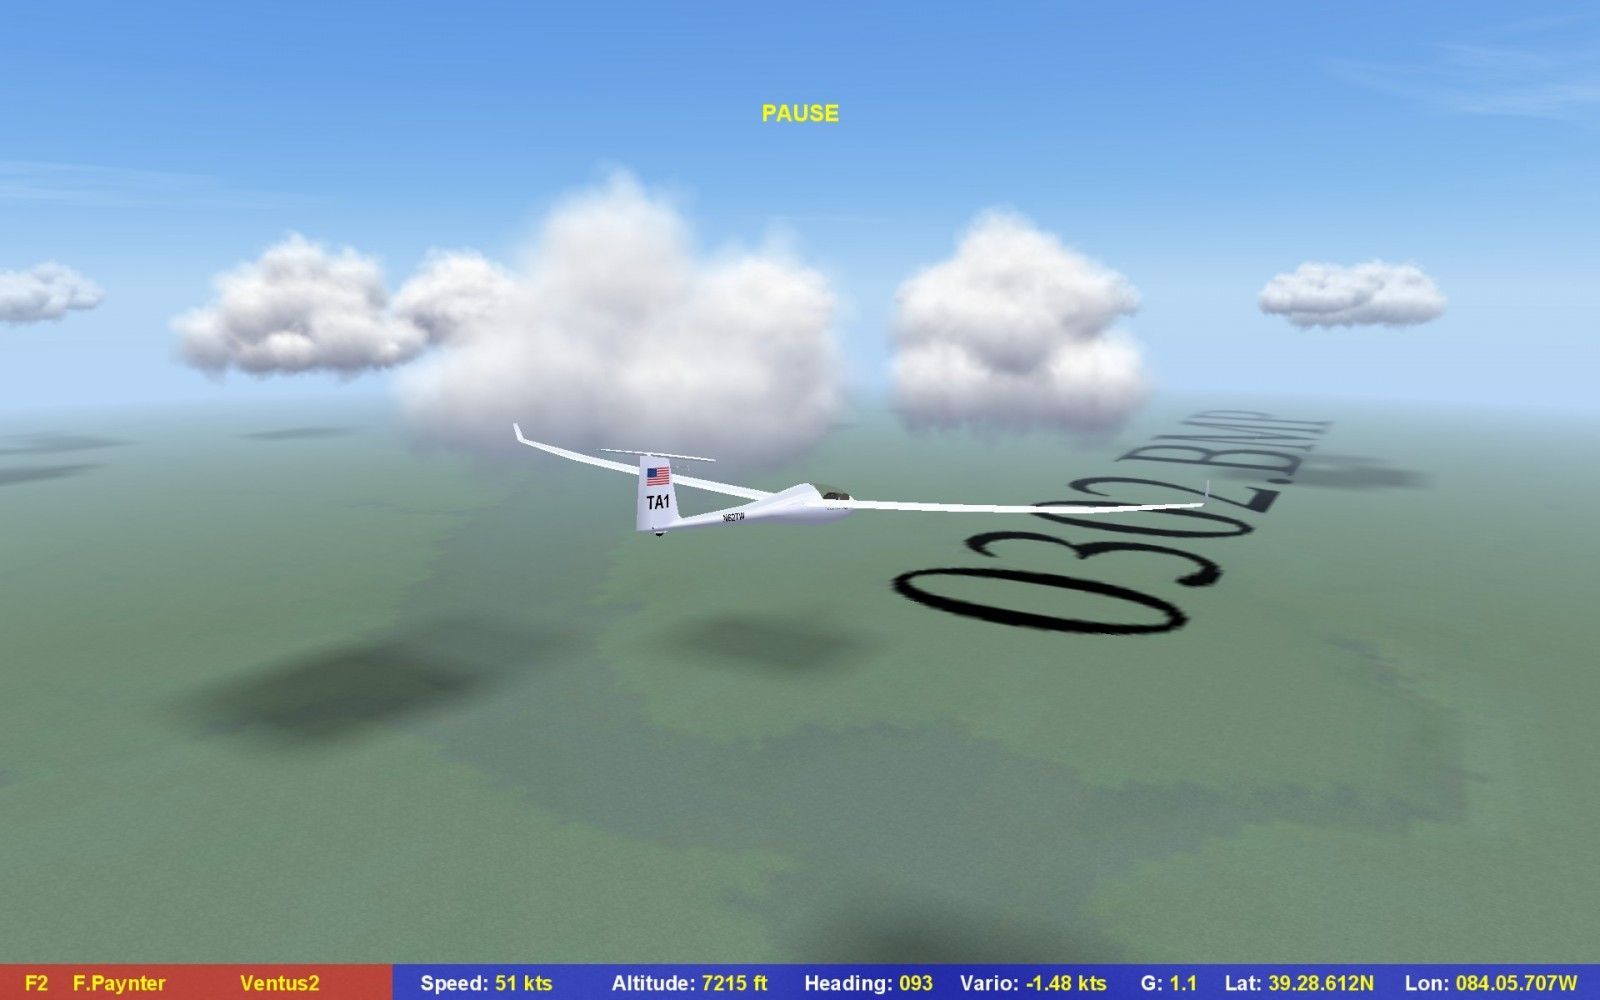
In Condor, showing modified tile just east of the CCSC airport
So at last some real progress, however small! I now understand a lot more about how the tools and processes mesh together to produce the images seen out the canopy when flying, and hopefully that understanding will eventually result in a completed landscape. However, there are still *lots* of things I don’t understand, including:
- I’m still not sure how to apply my SeeYou image of the CCSC area (showing towns, roads, lakes, etc) onto the tile images that LE uses to produce the DDS files. I *think* this involves first resizing the SeeYou image to cover the entire scenery, then slicing it into tile-sized pieces, and then overlaying each slice onto its associated tile)
- Assuming I don’t want to go the photorealistic route (yikes!), how do I go about modifying the tile images to produce the farmland, forest, and other textures? I think this is done in TG, but I’m not sure.
Ah well, it *is* supposed to be an adventure, and like any good adventure, it comes complete with advances and setbacks, failures, thrills and challenges ;-). I can’t thank David Regula enough for taking the time to talk to a newbie, and any errors, omissions, or downright falsehoods in my posts are totally my fault and not Dave’s!


3 comments for “Day 9”