Contents
Gliders, while being finished at the shop suffer from external factors which may not be properly controlled at that time. Humidity, temperature, drying times and so forth. While sanding (hours upon hours…) one gets pretty close and familiar with his ship, for example, why would the gelcoat within 2 feet suddenly get hard to sand? Why are there areas of flawless gelcoat right next to cracked and rough gelcoat? One can imagine the workers at the shop working on your wings for example, then going on break, the temperature/humidity changes a bit which affects the drying/curing time, the guys come back from break after the game has gone into penalty minutes and continue working on your ship. The result is the butterfly effect.
Materials Needed
- 2 buckets (floor washing size)
- water (tap or in my case 4-20L containers)
- large sponge I used an hourglass shaped one, 10″ long and 4″ thick
- a shammy cloth
- rags
- sand paper (wet type, black) and a backer board for the paper
For the backer board I used a 1″ and 2″ SM type Styrofoam because I found a few pieces in the shop, if you want to go high end, use a piece of balsa wood. Since I have never sanded a glider for looks and performance, I called a professional glider refinisher to find out which grits to use for this exercise. The grits suggested were 600-1000-1200 followed by the option of 1500 or mechanical polishing with a 3 part Norton liquid ice system.
The hardware store had the 600 and 1000 in 8.5″ by 11″ sheets in packs of 5 while the automotive shop had the higher grits in individual sheets and sometimes smaller sizes.
I have previously worked on 2 gliders (team effort) in respect to refinishing (gelcoat removal, minor repairs, new gelcoat followed by the polishing of the new material, +/- 200hrs.).
Like any project, it is always best to have all your materials on hand before you start. 5 sheets of each is a good starting point. I made the sanding block 11″ long by 3.25″ wide, I cut the paper in half which allowed enough paper to go up the sides of the block so that my fingers had something to grab.
Method
The glider was kept in the trailer, one wing was pulled out and placed on saw horses and after a days work put back in. When we had rain, I used a one man rigger and walked the wing over to an available hanger. I started with the left wing (tops only) and sanded the individual grits to completion, the right wing, the fuselage boom, tail and elevator then moved the fuselage into the shop to do the front of the glider.
I kept flying the ship while the work was in progress. Did I notice the yaw since one wing was done and not the other? Psychologically I was using more rudder. The only concern I had was the lack of uv protection during this time.
Time
How long did it take? In my case I was expecting about a week (40hrs.) I sound like management, I did the calculation while waxing and it came to under 60 hrs. I used blocks of 4 hours (am and pm work) to do the calculation, some blocks were longer and some were shorter but 60hrs. would be a good benchmark then again it depends on the shape of the ship and of course since you are a glider pilot, to what extreme are you going to go to in respect to acceptable workmanship. My goal was to get rid of the surface cracks without going through the gelcoat.
The wings were the easiest and based on surface area, the fastest to do. The boom went well but slower due to awkward body position, the tail slower then expected due to smaller and protruding parts and by the time I got to the cockpit area well I was sick and tired of sanding and of course it was the slowest, more on that later as well. Therefore I would break the 60 hrs. down to Wings-Fuselage-Cockpit/30-18-12hr. respectfully.
Glider Preparation
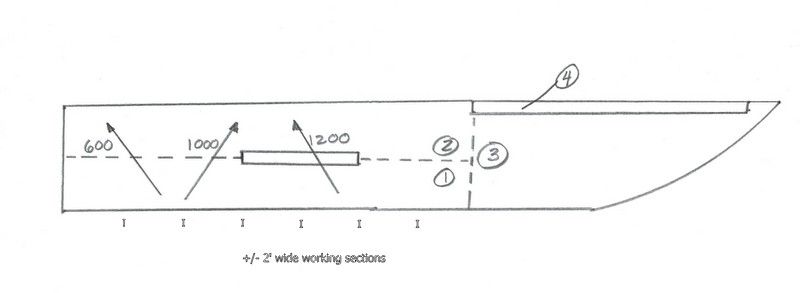
Use Mothers pre-wax cleaner to remove any of the tough stains (ie tape glue), cleaning is not really required since the 600 grit will remove any surface contamination . I removed all the mylar since it was time to replace them anyway (removing the two-face tape residue is not included in this paper and in my case another job of testing my patience). Make a sketch of a wing and fuselage and indicate with arrows the direction of each grit (figure 1 and 2). All sanding is wet and at 45 degrees to the chord. As you go up in grits, the sanding directions alternates. 600 went SW/NE at 45, 1000 went SE/NW at 45 and so forth (figure1). The sketch acts as a memory tool for when you restart sanding after taking a break. Sometimes one can see the scratch marks left by the previous grit but sometimes not, the sketch will definitely come in handy.
Sectioning the Work Areas
I sectioned the wing into four parts based on arms reach (figure 1) from root to aileron along the spar/spoiler box split the wing in two halves, aileron to tip and finally the aileron was done separately at the end. The fuselage was done in two parts (figure 2). The majority of the work was done with the glider in the trailer saddle and at times with the tail raised .5m to save my back (boom and tail). Part 2 (from the nose to the underside of wing root) was done in the shop where straps were available in order to suspend the fuselage upside down.
(figure 1)
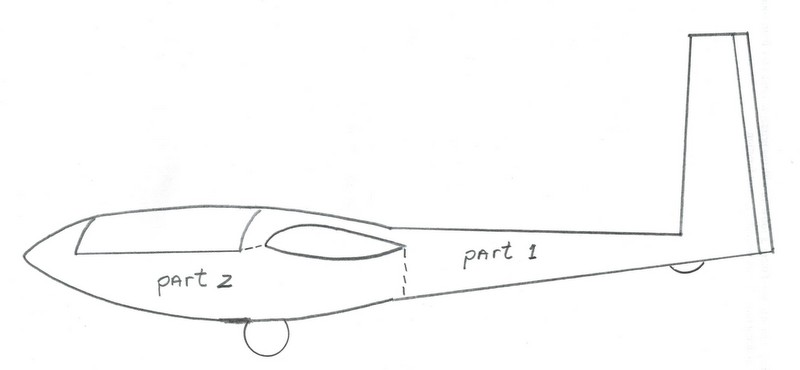
(figure 2)
Sanding
I started along the inboard leading edge and worked my way to the tip. My starting point was just underneath the leading edge to the dividing line mentioned above. I did this from the root all the way to the start of the aileron and from that point the wing is narrow enough that one can do the whole chord in one shot right to the tip.
The sanding process is as follows; wet the sandpaper, soak the clean sponge and wipe the working area and start sanding as above. My work area was approx. 2 feet wide from the leading edge to spar. I initially used pencil marks to show my start/finish points but with time and experience the marks won’t be necessary. Generally I would sand from left to right then right to left over my 2 foot working section, smooth rhythmic constant pressure strokes with enough overlap to make sure everything gets sanded. As previously mentioned, my wings were in sandpaper rough shape. I noticed two things while sanding; the sound and the amount of gelcoat on the sandpaper.
The sandpaper is black and goes cloudy white as you sand off the gelcoat. You won’t get too far with the 600 once you start, maybe 2 passes, 4 linear feet until the sandpaper needs to be rinsed. You will notice because the sandpaper will slide easier since the grit is saturated with gelcoat. Time to rinse, take your block with the paper and dunk it in the bucket a couple of times take either the shami or the sponge and wipe the sandpaper to get it as clean as possible, use the other side of the sponge and wipe the wing free of wet gelcoat and sand some more. Do a couple of passes (4 linear feet) and check the paper, does it have just as much cloudy white residue as the first pass? repeat the process, you will note that you will be getting less gelcoat on the paper as you sand since you will have removed the poor gelcoat with the first series of passes. In my case the work area went from night to day in about 6 passes of 600. I felt so good about the improvement that I actually thought of stopping right there. That thought went away pretty quick when I realized that I am a glider pilot and nothing is this easy. You have to remember, your wing is about 24 feet long, you will be sanding from both sides of the wing and the last 9 feet near the tip, that is about 40 linear feet of wing sanding. It is going to take some time but you just started and have already noticed a drastic improvement in the wings’ finish, you feel good because of this.
Kibitzers
It will only be natural for a glider kibitzer to show up and start asking questions. Expect this to happen more than once. The visit/comment that sticks out the most was of the pilot who questioned why I was only doing a 2-3 foot section instead of continuing all the way down the wing. My reply was instant gratification, accomplishment. His rebuttal was the possibility of over sanding or missing a piece between sections. Your call. I did the area between the root and spoiler in 3 shots, the spoiler in 2, the area between the spoiler and aileron in 2 and finally the last 9 feet in one go (figure 1).
Water
You will be amazed at the amount of water used in this exercise. If you have a water supply near by, no problem, if not, you will be making several trips to the tap to top up. I initially started with a 10 L and a couple of 20 L containers (water ballast), this was increased to 4-20 L jugs after one wing. I also increased the number of buckets from one to two (clean and dirty). Try to keep the clean water as uncontaminated as possible but with time it will become dirty. Use one bucket to clean the paper, the sponge and shamie, rinse as best you can outside the bucket and expect to do it a couple of times depending on how dirty they get in the process. I think that water is the secret ingredient when sanding your glider, continuously rinsing your work area with clean water and wiping is key to doing a nice job.
The ground around your work area will get saturated due to the amount of water used. You can minimize the wet spot by placing the buckets a small distance away and doing your cleaning and rinsing there.
Sanding fuselage (part 1)
Part one of the fuselage started from the rear of the canopy along the tops of the wing roots then encircling the fuselage toward the tail. I realized that due to the large cockpit diameter one could not do a practical sanding job while the glider is on the dolly therefore part two would have to take place in the shop.
The fuselage like the wing was divided in half along the spine. Each half was divided in three (12-2 o’clock, 2-4 and 4-6). The 4-6 was the most difficult since one has reach so far over in order get right to the underside. Sanding was easiest by placing my body on the opposite side of the sanding area. Remember, you are still sanding at a 45 degree angle based on the sketch you prepared. Proportionally, the fuselage has less area than the wing however in my case I needed more breaks due to the hinge action on my lower back. You can save a bit of the bending motion by putting a crate/box under the tail wheel to make it as practical as possible.
By the time I got to the tail, I was mentally doing fine but the back was tired. I used a chair and varied the height of the tail in order to keep going. A palm sized sanding block was used in this area due to the various curves. Contest and registration letters were taped over and the rear battery cover removed. In my case, the gelcoat was much thinner in this area, heads up.
The purpose of the incremental sanding grits was to removal the lines made by the previous grit. I found and confirmed with an employee from the body shop that as you go up in grits, you won’t have to sand as much since the goal is to remove and minimize the scratch marks.
Sanding cockpit (part 2)
In this particular case, straps were available to support the inverted fuselage (canopy removed), if not, saw horses can also do the job as long as you have taken the tipping motion into consideration.
My glider has a racing stripe from under the wing to the nose and back to the other side. My first thought was to remove the stripe and install a decal. I test drove removing a 6 inch section of the painted stripe from under the wing using “goof off”. I tried 3 other products and found this one worked the best. The problem with the removal was that the slurry was getting absorbed into the surrounding gelcoat and the work area required additional sanding. This was corrected by placing painters tape on either side of the stripe and restricting the slurry to the tape and stripe area. I gave up on the stripe removal and simply protected the stripe with tape such that the sanding did little damage to the stripe. As mentioned earlier, one will use litres of water while sanding. This water will find its way into the cockpit but you can reduce this by installing a drip edge using wide painters tape around the canopy perimeter. Since the glider was in the shop and inverted, it gave me the chance to do some repairs in this area. The sanding method is still the same and aided by the ever present sketch of sanding grits and directions. Please note, pay attention to your static ports, plug them up and don’t forget to remove the plugs after.
One can now see the light at the end of the tunnel.
Polishing using 3 step Norton liquid ice
Our last sanding grit was 1200 and for some that is plenty but for others, why not go one step further. You have 2 options, continue sanding with 1500 or use the Norton system. The reason I used Norton was because a fellow member had most of the materials. It consist of 3 steps using buffing pads and a variable speed polisher and the Norton liquid ice product (found at Napa Auto Parts). Here is the link to the method on youtube (http://www.youtube.com/watch?vd=A0hmkrC_TzE), skip to the 2:00 minute mark.
I have previously stated that after sanding with 600, I was ready to stop since the improvement was incredible and the look great, but every time another grit was used the look was better than before. The same can be said about the Norton liquid ice. Even though it is a 3 step process, it is fast and compared the labour involved with the sanding process much easier. Please note that caution is required when buffing near the edges, the pads will want to grab and burn your glider parts.
Since I did not sand the underside of my wings, I took this opportunity to use the Norton system to do so now after doing a thorough cleaning of the wings (mainly since I had lots of expensive liquid and the equipment/material on hand).
We are so close now that one can see the finish line. To make this exercise complete, all one has to do now is wax the puppy and the job is done.
Summary
My glider was due for something and I chose sanding. It took about 1.5 weeks to do the work and I flew 2 days during the process. My back became sore after a couple of days and therefore slowed me down. Those flying/break days did come in handy. Did I notice any improvement in the performance? Would you believe that I already noticed when I got 200 feet over the fence on take-off? Again this might be psychological but not to the extent that I felt at the controls. Was I able to stretch those 46km final glides? Yes I could and the 15kt tailwind had nothing to do with it.