 This is the second of two posts responding to a Condor Corner reader’s question about downloading sceneries and joining an online Condor race. The first post was an excerpt from my upcoming book ‘Cross Country Soaring with Condor’ dealing with sceneries, and this one is another excerpt dealing with joining online Condor races. As always, I would love to hear your comments/critiques.
Frank (TA)
Online Racing:
Introduction:
This section assumes you have successfully installed Condor and done the initial setup, you have flown in the offline ‘Free Flight’ mode long enough to be able to stay upright and aloft, and now you want to try your luck in an online competition. Online competitions require that someone, somewhere acts as a race ‘server’, and then competitors connect to that server over the internet. Anyone with a Condor program can act as the server, and can fly in the competition as well. So, for instance, I could email my buddy in East Ouagadougou and tell him that I was going to start up Condor on my PC and set up a race at such and such an IP address. My buddy would then start Condor on his PC, type in my IP address, and tell Condor to connect to that ‘server’. Assuming we did everything correctly, my glider and my buddy’s glider would now appear on the runway at the takeoff airport in the selected scenery, get towed up, and released just like in RL. I would see his glider through my canopy, and he would see mine through his. Any changes in my plane’s state (altitude, speed, attitude, etc) are instantly visible to my buddy, and vice versa.
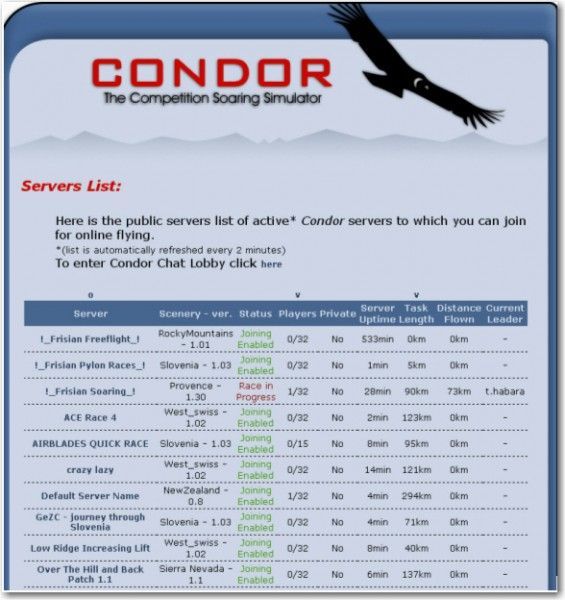
While the above method for holding online races will work fine, it’s a bit awkward having to announce the server URL and then having to type it in each time. So, the Condor Team maintains a central website where task setters can ‘announce’ servers in a very convenient way. Pilots who wish to join a race can simply click on a link, and their Condor program gets launched with all the relevant information already filled in. Shown below is a partial view of the Condor Server list, which can be found at http://www.condorsoaring.com/serverlist.php, along with a short description of each column in the list.
Server: This column shows the name assigned by the person advertising the online server site. This name is a clickable link.
Scenery – ver: The scenery required for this server. You must have this scenery installed on your PC. See the bottom of the server list page for a link to a site that has many (but not all) of the sceneries available for free download. Also, many popular sceneries, and all of the sceneries used for Monday Night Soaring (MNS) races, are available at http://www.gliderracing.com.
Status: Shows the current status of the server. ‘Joining Enabled’ means you can join the race. ‘Waiting for Start’ means it is closed for new pilots, but the race has not started. ‘Race in progress’ means the start gate has opened.
Players: This column shows the number of players currently connected to the server, and the maximum number allowed. The default maximum is 32, but you will sometimes see lower numbers set by the task setter to limit the load on the server.
Private: A ‘No’ in this column means anyone can join. A ‘Yes’ means you need a password to get in.
Server Uptime: The number of minutes since the server firsts announced the race. Note that large uptimes tend to indicate ‘free flight’ servers with no set task. Most races have a join time of between 5 and 30 minutes, so anything with an uptime of more than about 30 minutes with ‘Joining Enabled’ still showing is almost undoubtedly a zero-length task ‘free flight’ server.
Task Length: A task length of 0km means there is no task at all – it’s a free flight soaring area where you can just ‘fly locally’. A non-zero task length indicates a real task.
Distance Flown/Current leader. The distance flown by, and the name of, the current leader.
Connecting To The Server:
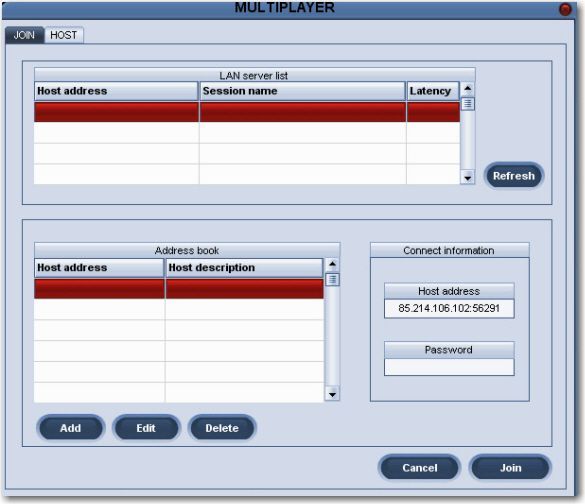
To initially connect to a server via the Condor Server List (by far the most common way of joining), you must first make sure that Condor *IS NOT* running on your PC. This is a bit counter-intuitive at first, but you get used to it pretty quickly. If you forget, Condor will remind you. Launch your favorite web browser, and navigate to the Condor Server List at http://www.soaringsim.com/serverlist.php. Click on the desired server name, and you will see Condor automatically launch and display a screen like the following:
Note the ‘Connect information’ section at the lower right has the server host address already filled in. If this particular race requires a password, you would enter it in the ‘Password’ field. Otherwise, leave it blank and click on ‘Join’.
Task and Plane Settings:
Once you have connected to a race server, a dialog showing all the relevant task and plane information will be presented, as shown in the following screenshots.
Information:
This screen shows while Condor is attempting to connect. If successful, the progress bar will show 100% and the message will change to ‘received server data’ for a few seconds, and then the additional screens shown below will be presented. If unsuccessful, this screen won’t disappear, but the connecting message will change to show the reason for the failure. ‘Host Not Found’ means nothing responded to the IP address. This can be a typing error if the address was entered manually, or the host went offline momentarily, or the server administrator didn’t know how to make the server publicly visible (seeing ‘Default Server Name’ for the host name is an indicator that the host can’t be reached)
Task Tab:
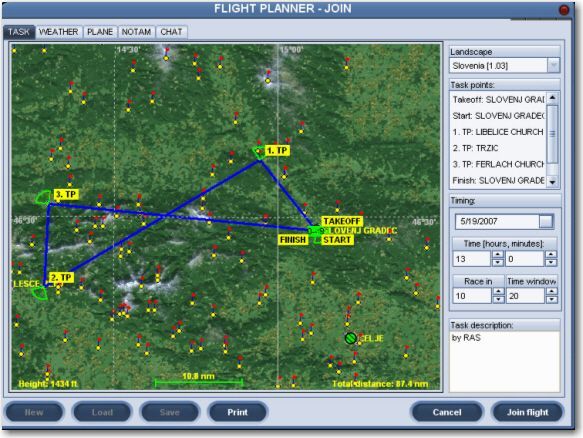
The task tab shows the task layout on a map of the scenery. Right-click options allow you to change the map scale and/or change the map display. Changing from ‘photo-realistic’ to a pseudo-colored height map type can be important for races in mountainous terrain, like Provence or New Zealand.
The right side shows race details like the scenery being used, the task waypoints, and task timing details. The ‘Time (hours, minutes)’ field shows the time of day in the race scenery at the time the server started (often, but not always, a little after noon). The ‘Race in’ field shows the number of minutes between when the join time ends and the race start window opens. The ‘Time window’ field shows the number of minutes that the start gate is open. Note that in Condor races, the start window is often fairly short to keep the entire race time within bounds. Important! If the ‘Time window’ field shows 0, then the race will have a regatta start, and all pilots’ elapsed time starts at the end of the ‘Race in’ period, whether or not a pilot has actually crossed the start line!
Plane Tab:
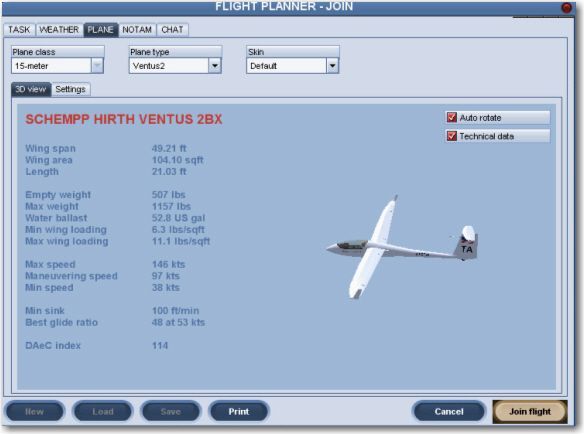
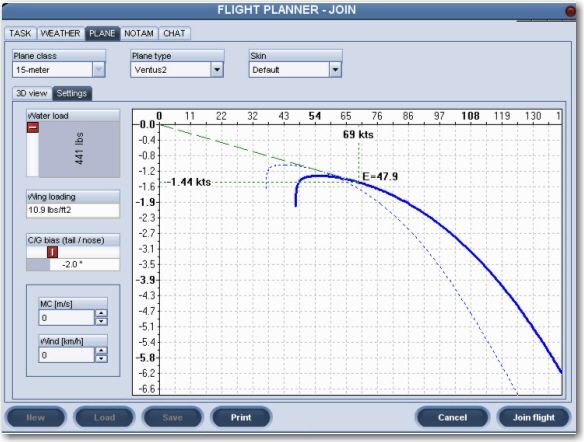
This screen has two sub-tabs: The 3D view shows a rotating view of the selected glider, and the ‘Settings tab allows you to set the water ballast level (if enabled), and the CG setting for the race (I typically use a CG setting of between -1.6 and -2.0 inches for better low-speed thermalling performance without significantly affecting high-speed cruise performance). The ‘Plane class’ field can be fixed to a particular class by the race organizer, or it can be a handicapped race where you can fly anything. The ‘Plane type’ field shows the models available for the selected class. Note that unless you have purchased and installed Plane Pack 1, some of the more modern 18-meter gliders won’t be available. Plane Pack 2 adds many popular Club Class gliders, including my beloved LS-4. The ‘skin’ field allows the use of custom paint schemes for your glider (*but* – your whizzo custom paint job won’t be visible to other pilots unless they also have your paint scheme installed on their PC, which makes this feature almost useless).
Weather Tab:
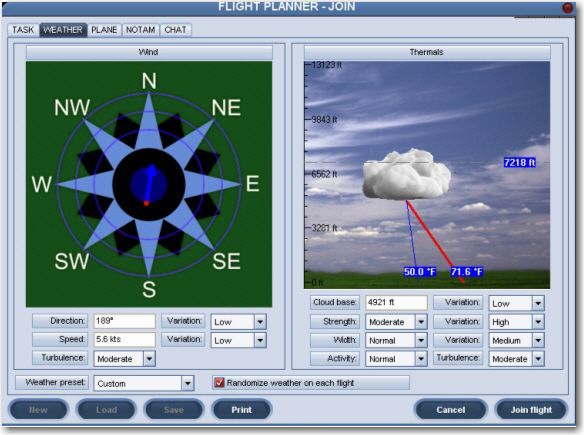
This tab shows the relevant weather parameters set by the race organizer for the flight. This is mostly self-explanatory. Watch out for situations where the weather parameters have ‘high’ variation!
NOTAM Tab:
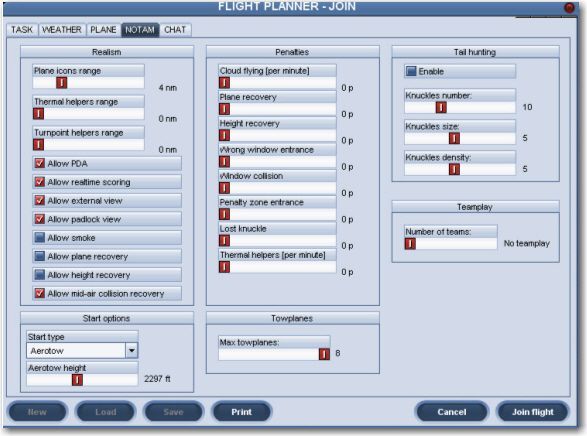
Take some time to look over the information on this tab, as there are a few very important items.
The Realism section shows how far away you can see glider ‘tags’, how far away you can see thermals (almost always set to zero for a real race), and how far away a turnpoint ‘pole’ can be seen (also generally set to zero for real races). The ‘Monday Night Soaring’ (MNS) race organizers generally set the Plane icons range to 1nm (very realistic), while other races tend to use larger values. Even without the tags, you can still see other gliders, just not quite as far away.
The checkboxes in the realism section enable/disable various realism options. The ones that are most often used for races are ‘Allow PDA’, ‘Allow External view’ (handy to check that you really did load up with ballast), and ‘Allow mid-air collision recovery’ (the Q key on the keyboard). This last option is very necessary in Condor due to the reduced peripheral vision inherent in all PC games and the close proximities inherent in gaggle flying. It’s not at all unusual to have several mid-airs in the pre-start gaggles. The ‘Q’ keyboard key recovers from a mid-air (note – you may also have to hit ‘F1’ after hitting ‘Q’ to get back in the cockpit after having been ejected).
The sliders in the ‘Penalties’ section set the penalty levels for various activities. The only important one for real races is the ‘Cloud flying’ penalty. MNS generally sets this to zero, but most other races have a non-zero cloud flying penalty.
The ‘Tail hunting’ and ‘Teamplay’ sections are almost never used in real competitions.
The ‘Start options’ and ‘Towplanes’ sections are set by the race organizers. It is sometimes useful to glance at the ‘Start type’, so you’ll know to have your hand on the joystick if it is set for ‘Airborne’ or ‘Winch’.
Joining a Race:
After everything is set up the way you like in the Task setup pages, simply click on the ‘Join Flight’ button on any page to actually join the flight. Before clicking on ‘Join Flight’ you are ‘In the GUI’, and your status will be visible to other players as ‘connected’. Once you join the flight, your status changes to ‘in the game’ and now your glider will be visible to others.
Flying
Flying in Condor is very much like flying gliders in RL. If you are an experienced cross-country glider pilot, those techniques transfer readily into the Condor world. However, there are some aspects of the Condor world that aren’t obvious to new users, so I have attempted to describe some of them here.
Chat Feature and TeamSpeak
The Condor equivalent of the glider radio is the ‘chat’ feature, enabled with the keyboard ‘Return’ key. When ‘Return’ is pressed, a chat fill-in field appears at the bottom left of the screen, as shown in the following screenshot. Pressing ‘Enter’ again transmits whatever you typed to everyone else on the server. Note the default frequency for this fill-in field is 123.5, BUT it can be (and sometimes is, inadvertently) changed! The backslash (\) and single-quote (‘) keys step the frequency up and down in 0.25MHz steps, respectively. If you change the frequency (inadvertently or otherwise), only those on the same frequency will ‘hear’ you. Fortunately, non-default freqs are shown in RED so its easy to see when you’ve screwed up.
TeamSpeak is an application developed for use in multi-player team-oriented online games that has been adapted for use in Condor. Users connected to a TeamSpeak (TS) server can talk to each other in real time, independently of the Condor application itself. Condor supports this by allowing a joystick button (typically the trigger button) to be used as a push-to-talk switch in TeamSpeak. I personally don’t use TS much, as it is every bit as much of a distraction as using the radio in RL, but it can be very useful for team flying or leader-follower flights. See http://www.teamspeak.com/ for details.
PDA Basics
The PDA that comes with Condor is actually pretty good, although it does have some significant limitations. The worst problem with the PDA is that it is limited to north-up orientation, which means that when the task line happens to be oriented more east-west than north-south, it is much harder to look ahead for potential problem areas. There are 4 separate pages available in the PDA, accessible via the 1,2,3,4 number keys, but the ‘4’ page actually has two different sub-screens.
Screen 1: Map View:
This shows the traditional map view of the task, using whatever map type was initially selected when first entering the race. The PageUp/Down keys change the scale, and the ‘Cockpit Zoom’ (Y) keyboard key zooms in on the PDA (very helpful in bridging between map zoom scales).
Screen 2: Next Waypoint View:
Shows the next and subsequent waypoints. Useless.
Screen 3: Final Glide View:
Shows the final glide situation for the next and subsequent waypoints at the selected MC value. Here ‘DH’ means your current height above the target waypoint, and ‘DDH’ means your calculated arrival height above the target waypoint. PageUp/Down moves up & down through waypoints (+1 means the 1st waypoint after the next one, etc). Very helpful.
Screen 4a: Wind View:
Shows the current wind at the current altitude. Extremely useful for ridge tasks.
Screen 4b: Bread-crumb View:
Shows the last few minutes of lift/sink activity. Extremely useful for centering thermals. PageUp/Down changes the scale.
The ‘Tilde’(~) key:
If you read the manual very closely, you will find that the Tilde (~) keyboard key toggles main screen readouts on and off, including the chat text and flap/trim position readouts. I’ve never had the occasion to deliberately disable readouts, but I have inadvertently done so on a number of occasions while going after the ‘1’ (map) key. So, when this happens to you and you can’t figure out why readouts don’t work anymore, try hitting the tilde key and see if it all comes back.
