 I got an email from a Condor Corner reader asking for some help in downloading and installing Condor Sceneries, and for help with joining an online race. Instead of answering him directly, I thought I might post the information here so others can benefit. This post is a small excerpt from my upcoming book ‘Cross Country Soaring with Condor’. A subsequent post will be another excerpt dealing with joining an online race.
Downloading and Installing Sceneries:
Condor sceneries are complete descriptions of a flying area, usually measuring hundreds of kilometers on a side. Terrain elevation information is usually very accurate, as it is derived from worldwide GPS elevation maps. Other information, like trees, roads, rivers, etc may be more or less complete, depending on the skill and pain tolerance of the designer, and range from sparse (Sierra Nevada, Rio Grande) to wonderfully rich (West Swiss, Alpi). All Condor sceneries reside in the Condor\Landscapes folder, with a separate folder for each scenery, i.e. c:\program files\condor\landscapes\Seirra Nevada. Installing a new scenery is simply the process of loading the new scenery files into the proper subfolder in the Landscapes folder
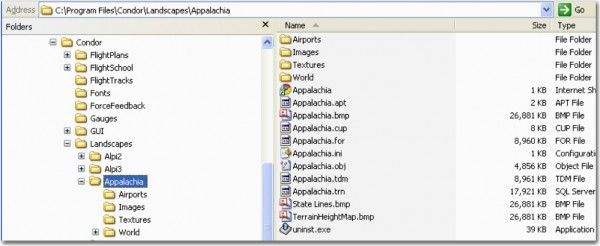
Scenery downloads come in two basic forms – a self-executing install file that does all the work for you, or a compressed file (ZIP or 7Z) that must be extracted to the proper place in the Condor folder tree. The figure below shows a partial layout of my c:\program files\landscape folder, with the Appalachia subfolder partially expanded. In the figure, note the ‘Appalachia.cup’ file; this is a standard SeeYou compatible waypoints file that can be used just like any other waypoints file for an external PDA. It can also be loaded directly into SeeYou, and then saved in other waypoint formats if your PDA doesn’t support .CUP files.
Executable Install File:
To install a scenery that uses a self-executing install program, simply download the file, launch it (double-click) to execute the install program, and sip coffee while it does its thing. After the install completes, the new subfolder can be found in c:\program files\condor\landscapes. An example of this style is the very popular Mifflin scenery, available from http://www.gliderracing.com as Mifflin_Setup.exe.
Compressed Scenery File:
Download the scenery file to your PC. For example, go to http://www.gliderracing.com and download the Sierra_Nevada_1.1.ZIP file
Manually extract the compressed files into the proper place in the Condor folder tree. For WinZip files, this can usually be accomplished by right-clicking on the downloaded ZIP file and selecting ‘Extract To…’. This brings up a dialog allowing you to choose the folder where the extraction will start. Navigate to C:\Program Files\Condor\Landscapes and click ‘OK’.
Some compressed scenery packages come in the alternative .7Z compression format. If you have downloaded one of these packages, you will need to also download and install the free 7Zip extraction program from http://www.7-zip.org/download.html or update your WinZip program to one of the later versions that also supports the .7Z extension (I have WinZip v15 pro and it handles .7Z). Installing a .7Z package is very similar to installing a .ZIP one – simply set the extraction point to c:\program files\condor\landscapes.
As always, comments are welcome!
Frank (TA)




5 comments for “Installing Sceneries in Condor”