 Here’s another excerpt from my upcoming book ‘Cross Country Soaring with Condor’. This one deals with setting up Condor to host a race on your own PC. Condor was designed from the ground up as an online multiplayer soaring simulator, so it’s not surprising that hosting an online race is pretty straightforward. When Condor is installed on your PC, there are actually three different executable programs installed:
- Condor.exe – the ‘client’ program that displays the view out your canopy (including the images of other gliders in your local airspace). This is the program that runs when you select ‘Free Flight’ or when you join an online race
- CondorServer.exe – A ‘server’ program that is used to host a game that others can join across the internet. When you host a flight from inside the Condor ‘client’ program, as described below, the ‘client’ program launches CondorServer.exe to actually host the race, and then the ‘client’ (Condor.exe) joins the race as just another glider via the ‘localhost’ connection (a special internal arrangement whereby a PC can connect to itself as if it were connecting from across the internet).
- CondorDedicated.exe – another ‘server’ program. This one is intended to run on a separate PC to host one or more races as a ‘standalone’ server program. It allows race hosting to be automated and managed remotely by providing a ‘script’ management language. If you are interested in hosting regular races, you should take the time to become familiar with this, and with Thomas Hitziger’s wonderful ‘DSHelper’ program(http://software.hitziger.net/index.php?show=programs&nr=2)
Hosting your own race in Condor
Hosting your own race, or flight in Condor is actually pretty easy, although it does take some adjustments to the typical home network router to allow other pilots to connect to your race. The program allows anyone to create a multiplayer environment for others to share, and the game server can be automatically advertised on the Condor Server List (http://www.condorsoaring.com/serverlist.php). The only difficulty with this process is convincing your local network router to let player requests on port 56278 (the default Condor port) through the firewall. If this is not done properly, other players will be able to see the server name on the Condor server list, but will get a ‘host not found’ error when they try to connect.
Setting up the Router:
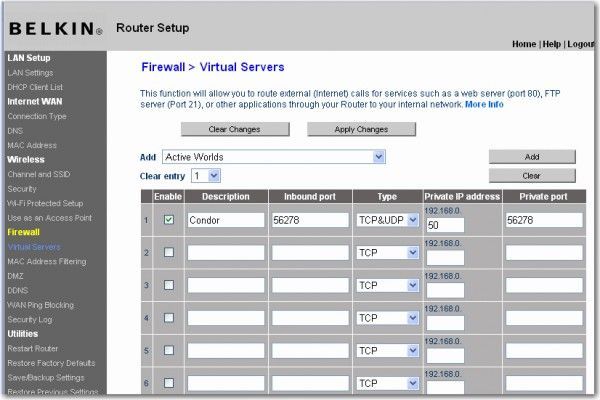
The typical home network router allows one or more ‘virtual PC’s to be specified to respond to requests from external clients. This arrangement is necessary because individual PC IP addresses are not normally available to the outside world. From the outside, your entire home network looks like just one IP address. Consequently, the router has to know what to do with a request for a particular service – i.e. which internal PC should handle it. On my Belkin home wireless router, the virtual server setup page is shown in the following image: Figure 44: Virtual server setup page On this page I entered ‘Condor’ for the description, 56278 for the inbound and private port numbers, and selected ‘TCP&UDP’ (sometimes this is called ‘both’) for the packet type, and ‘50’ for the address (my internal PC has IP address 192.168.0.50, but everything but the last number is known already). This tells the router to pass any external request for service on port 56278 as a request to port 56278 on the PC located at 192.168.0.50 on the internal network. The setup for your router will be similar.
Setting up Condor to host a multiplayer flight.
The following describes the procedure for setting up and launching a multiplayer flight.
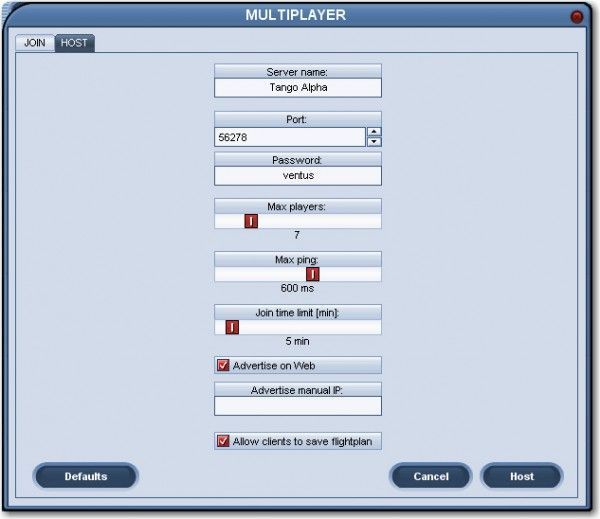
- Launch Condor and select ‘Multiplayer’: On the resulting dialog, select the ‘Host’ tab, as shown in Figure X below. On this page, fill out the Server Name as you would like it to appear on the Condor public server page. If you would like the flight to be password protected, then enter a password. If this field is blank, the flight will be open to anyone. The maximum number of players in any one server is 32, but most home PCs will start to bog down well before that. The default is 7, and that is probably a good number to use. Max ping is used to prevent a player with a very bad connection from slowing everyone else down. The default is 600. the Join Time is the length of time that joining is available after the server first becomes visible on the Server Lists. Longer times give more people time to join, but also means more delay for everyone else. If you are just meeting one person for a one-on-one session, set this to 5 minutes. If you are hosting a flight where many people will be joining, 10-15 minutes is a reasonable number. If the ‘Advertise on Web’ box is checked (the default), then the server name will automatically be displayed on the server list, allowing other players to simply double-click on the name to join. Otherwise, the other players will have to know the specific IP address of the server. Leave it checked. If the ‘Allow clients to save flight plan’ is checked (the default) then the other players can save the flight plan on their PCs and refly it at a later date if they wish. Leave it checked unless you have a good reason.
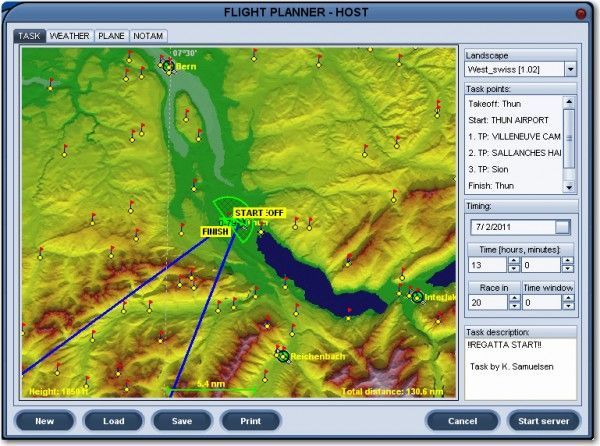
- Click on the ‘Host’ button: This will launch the host flight planner dialog as shown below. This dialog is identical to the one that is presented when joining someone else’s race, except now you get to change the settings instead of just viewing them. Previously saved flight plans can be loaded from disk, and this flight plan can be saved to disk before starting the server. I highly recommend saving the flight plan, even if you don’t think you will ever use it again. If something happens and you have to restart the server, you can simply reload the flight from disk rather than having to completely re-enter everything. When you are finished, click on ‘Start Server’ to begin the flight. Note that ‘Start Server’ also puts you into the flight, so be ready!
